Database Backup, Restore, and Data Retention
Your Security Console features a built-in database backup function that you can run manually or according to a configured schedule. You can use these backups to restore your Security Console on a new or existing host machine.
In addition to these backup and restore functions, the Security Console also allows you to configure retention settings for the various types of data stored as a result of your scans and generated reports. Configuring data retention settings allows the Security Console to automatically purge historical data that ages beyond a specified timeframe, which optimizes console performance and saves disk space.
IMPORTANT - Read the pre-backup and restore checklist
Rapid7 strongly recommends that you review the pre-backup and restore checklist before you begin so you can verify that your environment is prepared for backup and restore tasks.
Included Data Types
A Security Console backup includes the following data types:
- The contents of the database itself
- Configuration files:
nsc.xmlnse.xmluserdb.xmlconsoles.xml
- Licenses
- Keystores
- Report images
- Custom report templates
- Custom scan templates
- Generated reports
- Custom risk strategies
- Custom SCAP data
- Scan logs
- Users and user credentials
Maintenance Mode Overview
“Maintenance mode” is a Security Console startup mode that allows the console to perform a backup or restore operation, as well as recover from a critical failure. While in maintenance mode, normal Security Console operations like scanning and report generation are unavailable. Maintenance mode renders the Security Console inaccessible for most users, but Global Administrators can still log in to view the progress of ongoing backup, restore, and recovery processes.
Standard and Platform-Independent Backups
The Security Console can produce two types of database backups: a standard backup and a platform-independent backup. These backup types have different characteristics and are best suited to specific use cases.
Standard Backup
A standard backup is a basic copy of the database as is. Standard backup operations are quicker than platform-independent backup operations, but also produce a backup with a larger file size than a platform-independent operation would. Since standard backups are raw duplicates of your current operating system-specific database, they are only suitable for restorations on your existing Security Console host.
Platform-Independent Backup
Common in Security Console migration scenarios, a platform-independent backup is composed of an export of your database instead of a raw copy. This export operation takes longer to complete than a standard backup operation does, but the resulting backup file is compatible with any supported Security Console host machine. In addition, platform-independent backup files have a smaller storage impact than their standard counterparts.
NOTE - Storage considerations during restoration
While platform-independent backups are smaller in size than standard ones, they do require more free storage during a restoration. In the course of restoring a platform-independent backup on a new Security Console, the import operation extracts the contents of the database export first, effectively doubling the size of the backup files. Although these temporary files are removed when the restoration finishes, you still need to make sure your new Security Console host has enough disk space available to accommodate this database export extraction step.
Platform-independent backups are also useful in certain troubleshooting scenarios. If your existing database is experiencing indexing errors, a database export operation conducted during a platform-independent backup might resolve the issue.
Required Disk Space Estimates
When the “Maintenance” page finishes loading in your browser, the Security Console will estimate the file size of any new backup that you intend to create at that point in time. The interface will alert you if this estimate exceeds the available storage you have on your host machine. For efficiency purposes, these backup file size estimates are not precisely calculated, but are designed to be conservative enough to ensure that the Security Console can create your backup successfully.
The Security Console calculates these estimates in one of the following ways:
- If your Security Console has not created a backup in the last 90 days, it will estimate the file size of a new backup based on the size of your database when the console was last initialized. This estimate will also factor in an allowance for the integration of any new data that may have occurred since initialization.
- If your Security Console has created a backup in the last 90 days, it will estimate the file size of the new backup based on file size of this previous backup. Like the first case, this estimate will also be skewed toward a larger size to account for additional data.
If these are just estimates, can I still perform a backup operation if I get a disk space alert?
Yes. The Security Console will not prevent you from attempting a backup operation, with or without a disk space alert. However, bear in mind that the Security Console can only determine with certainty whether available disk space is sufficient after it restarts in maintenance mode. If available disk space proves to be insufficient, the Security Console will not create a new backup. Scheduled backup operations will behave in the same way.
Manage low disk space
If you have low disk space on your host machine, complete the following steps to reclaim disk space.
Task 1: Review disk space usage
- Access the Security Console from your host machine.
- On the Administration page, in the Troubleshooting > Run Commands.
- Type the
show hostcommand to display available disk space - Review the disk space results to identify the best area to reclaim disk space.
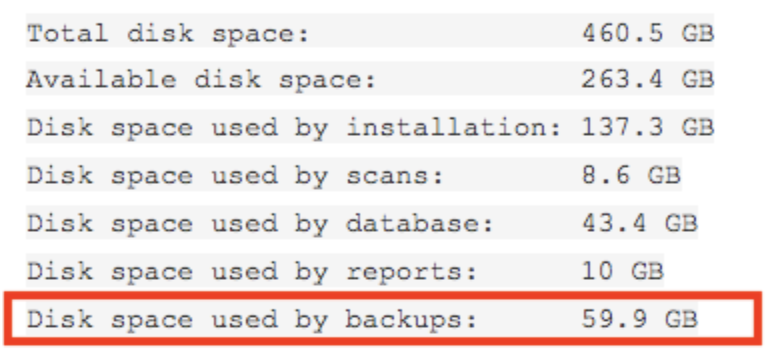
In this example, almost 60GB are used for backups.
Keep Backups in a Safe Location
As a best practice, keep backups in a safe location separate from the console.
Task 2: Remove old backups
We recommend making a backup schedule and relocating backups to a safe location on a regular basis.
- On the Administration page, click Database > Settings.
- (Recommended) Click the Create A Backup Schedule tab to create a backup schedule.
- Click the trash icon to delete recent backups.
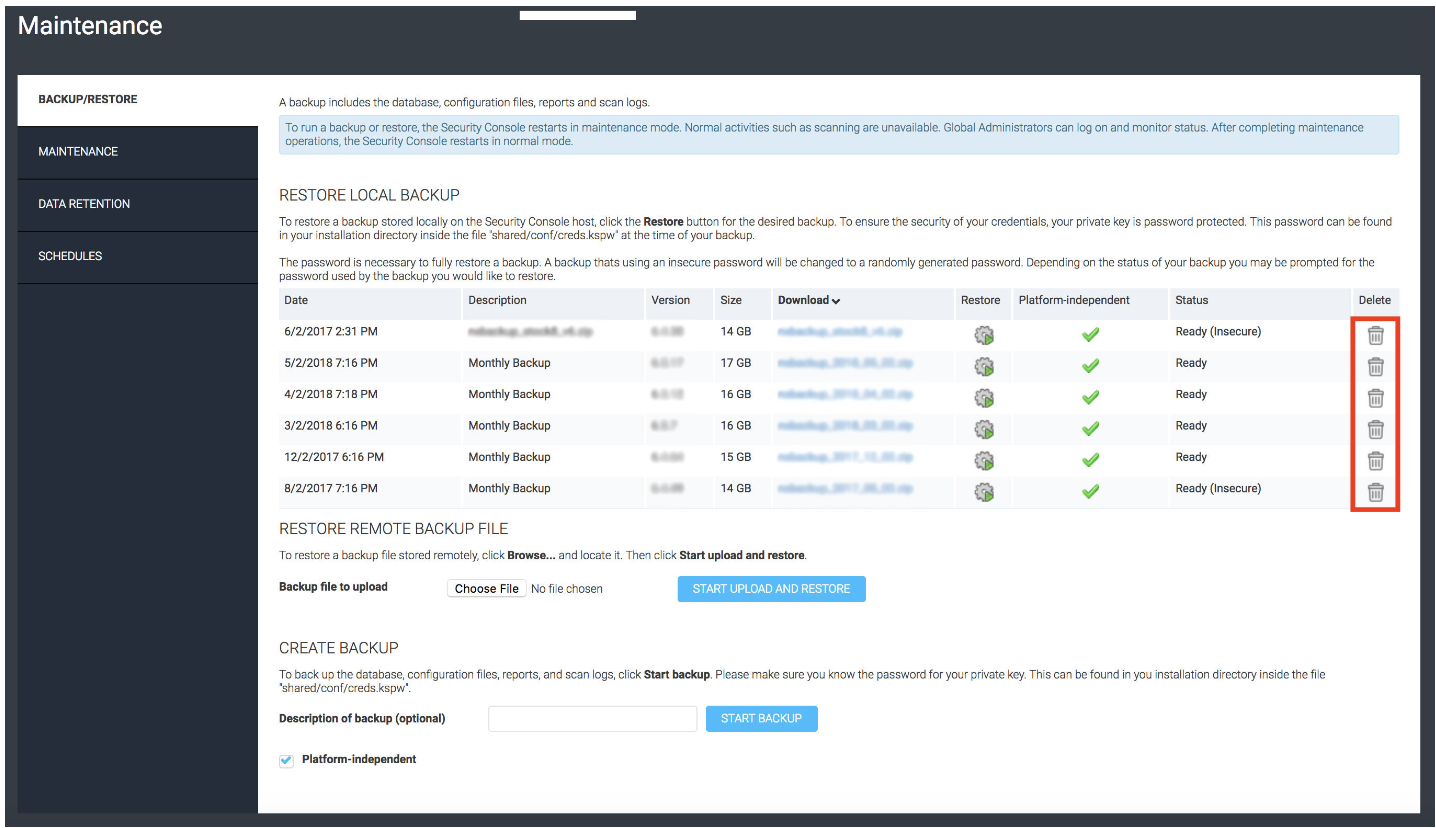
Backups can also be moved or deleted from their location on disk. By default, backups are located at:
[install_dir]/nsc/backups where [install_dir] defaults to /opt/rapid7/nexpose on Linux and {{C:\Program Files\Nexpose }} on Windows.
Task 3: Remove old scan logs
Another way to free up disk space is to delete old or large scan logs. By default, scan logs are located at: [install_dir]/nse/scans/0000000 where [install_dir] defaults to /opt/rapid7/nexpose on Linux and C:\Program Files\Nexpose on Windows.
Deletion of Scan Logs
Deleting scan logs does not affect assets or vulnerability data; however, it does impact the ability to retrieve scan logs for troubleshooting or audit requirements, so this needs to be accounted for if you are deleting them.
Do Not Remove Directories
Make sure not to remove any directories that are actively being written to (aka currently running scans), as you will corrupt that scan. To prevent any issues, make sure to only remove folders when you have NO scans running.
- Run the following command on Linux to determine the scan directory consuming the most disk space:
du -h [install_dir]/nse/scans/0000000* - Ensure that the scan consuming the most disk space is not running.
- To delete the directory, enter:
rm -rf [install_dir]/nse/scans/0000000B, where 00000B is the unnecessary scan is consuming the most space, to delete the directory.
Example
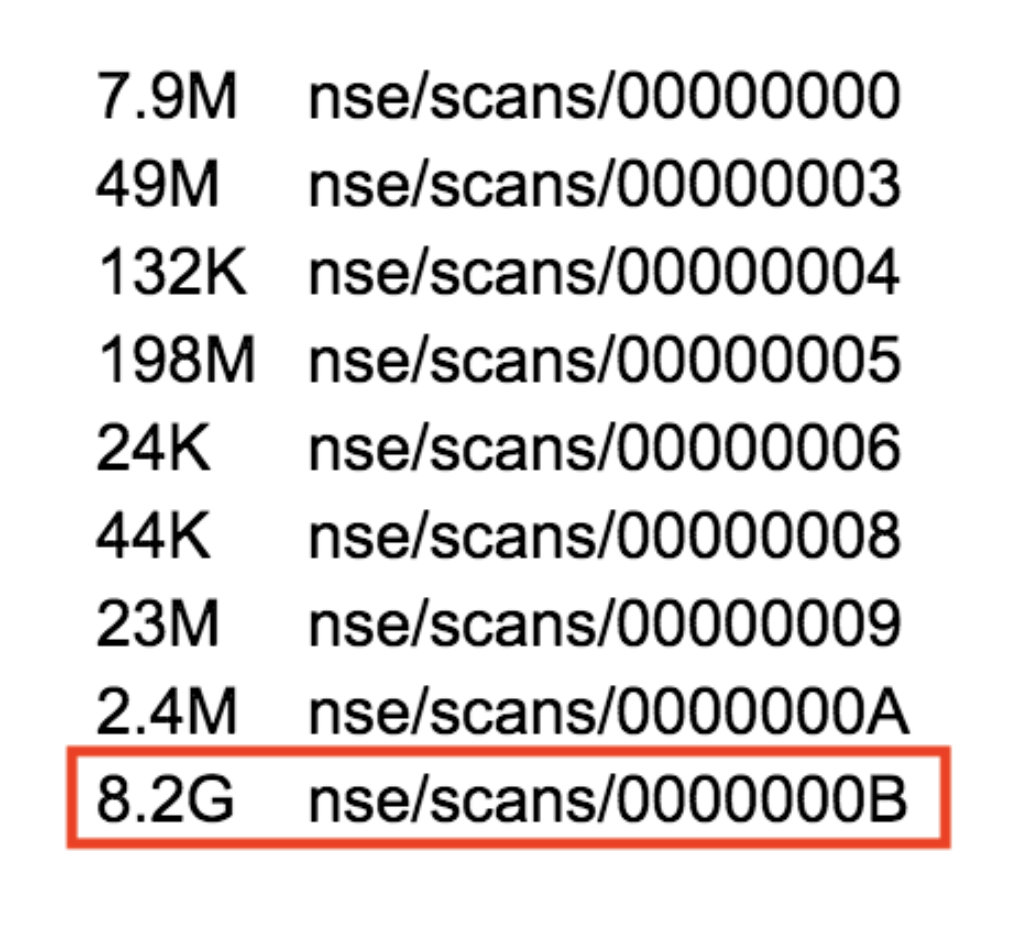
In the example above, the nse/scans/0000000B directory is consuming the majority of the 8.5GB used by scans. This directory can be safely deleted if there are no scans in progress.
To delete the directory, enter: rm -rf [install_dir]/nse/scans/0000000B
Task 4: Update data retention settings
Data retention settings can be adjusted to reclaim storage space.
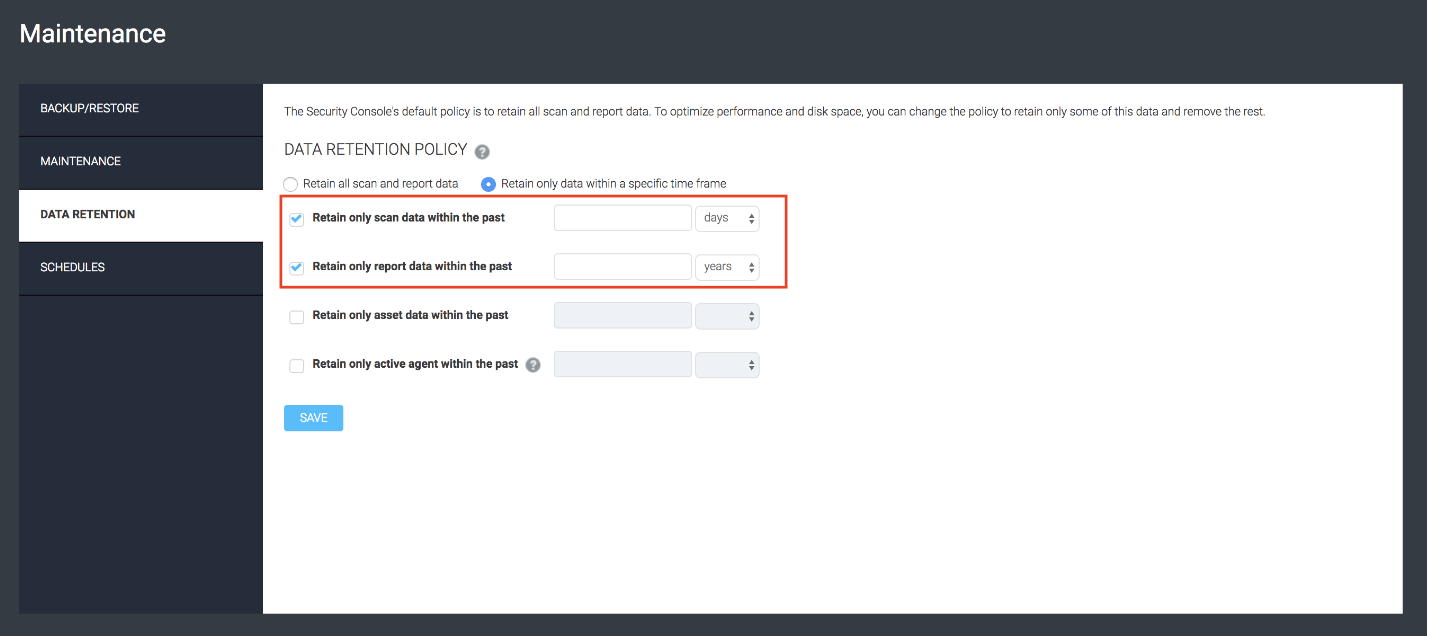
- Click the Data Retention tab.
- Adjust the Data Retention settings to a smaller time frame.
View our Data Retention docs for more details.
Before modifying the Data Retention settings, run a backup, because past data will be permanently deleted. Your backup may fail due to low disk space, so we recommend the first two options before modifying your Data Retention settings.
Constraint Validation Service
If you create your backup file manually, you can instruct the Security Console to perform a preliminary validation service that checks for and fixes any constraint violations found in your database. This service ensures that your resulting backup file will be free of any issues that could prevent it from being restored on your current or new Security Console host in the future. The constraint validation service will run before the Security Console restarts in maintenance mode to create your backup file.
NOTE - Scheduled backups will not run this service
Depending on the size of your database, the constraint validation and remediation service can significantly lengthen the time required to create your backup file. To avoid potential disruptions to your existing backup schedule, scheduled backups will not run this service.
Pre-Backup and Restore Checklist
To ensure that your database backup and restore procedures go smoothly, consider the following points before you start:
- DO NOT deactivate the Security Console on the Insight platform - Deactivating your existing Security Console prematurely will result in the permanent loss of all your cloud data. Your backup contains all the required data to restore the pairing between your new Security Console and the Insight platform, so deactivation is unnecessary.
- If possible, create your backup immediately before attempting to restore - Restoring from a recent backup helps maintain data synchronization between the Security Console and the Insight platform.
- Make sure no scans are running - Backup and restore functions put the Security Console in a limited startup state called maintenance mode. Scans and other typical console operations cannot run while maintenance mode is active.
- Locate and note the password to your private key - All installations of the Security Console include a randomly generated password to the private key. This private key maintains the credentials that you have configured for authenticated scanning purposes and is password protected to ensure it remains secure. If you attempt to restore a backup with a private key password that does not match the current private key password of your new Security Console installation, you will be prompted for the original password in order to transfer your credentials during the restoration. You can still restore without providing this password, but doing so will prevent your scan credentials from restoring. You can locate the password to your private key in the
creds.kspwfile in your Security Console installation directory:- Linux -
/opt/rapid7/nexpose/shared/conf/creds.kspw - Windows -
C:\Program Files\Rapid7\nexpose\shared\conf\creds.kspw
- Linux -
- If you are migrating your Security Console to a new host, create the
/backupsdirectory first - You must manually place your migrated backup in the/backupsdirectory on your new Security Console host in order to restore it. This directory does not exist on fresh installations of the Security Console, so you must also create this directory manually. It’s a good idea to make sure this directory is already in place by the time your backup is ready to move. Create your/backupsdirectory on your new host in the following location:- Linux -
/opt/rapid7/nexpose/nsc - Windows -
C:\Program Files\Rapid7\nexpose\nsc
- Linux -
- If you are migrating your Security Console to a new host, upgrade your current database to the latest version of PostgreSQL beforehand if you have not done so already - As of product version 6.6.230, new installations of the Security Console already include the latest version of the PostgreSQL database. Security Console backups created from a database running pre-migration versions are not restorable on installations running the latest version, so make sure that you complete your database upgrade on your existing host machine before migrating your installation to a new host.
Perform a Backup
If you want to perform a manual backup of the Security Console, follow these steps:
- In your Security Console, expand the left menu and click the Administration tab, and click Database > Backup and Retention.
- Click the Backup/Restore tab.
NOTE
Depending on the result of your required disk space estimate, you may see an alert upon page load indicating that your host might not have enough disk space to create a new backup file. This will not prevent you from starting the backup operation, but we recommend that you free up disk space on your host machine as necessary before proceeding.
- In the Create Backup section, give your backup a brief description for reference purposes.
- Configure your backup file by checking the Platform-independent and Validate constraints boxes as needed.
- Click Start Backup. A dialog box will appear explaining what the Security Console will do to create the backup file.
NOTE
Be aware that you should be committed to the backup procedure at this stage before continuing. You cannot stop a backup procedure after confirming, and as explained earlier, you will not be able to use the Security Console while it creates the backup file in maintenance mode.
- Click Backup System.
Immediately after you confirm the start of the backup procedure, the Security Console will run the constraint validation service described previously if you have configured it to do so. As soon as the constraint validation service completes (or as soon as you click Backup System if you elected not to run the service), your Security Console will automatically restart in maintenance mode and begin writing your backup file to disk. Global Administrators can log in to the Security Console to view the backups tasks as they progress. The Security Console will automatically restart when the backup procedure completes successfully.
IMPORTANT
If the backup is unsuccessful for any reason or if the Security Console does not restart automatically, contact Rapid7 Support .
After your Security Console restarts, your backup will appear in the “Restore Local Backup” section of the Backup/Restore tab.
Create a Backup Schedule
You can configure a schedule to allow the Security Console to perform backups on its own, saving you from the need to create these backups manually. If you want to mitigate against critical failure scenarios, a backup schedule significantly improves your recovery position.
To configure a backup schedule:
- In your Security Console, expand the left menu and click the Administration tab, and click Database > Backup and Retention.
- Click the Schedules tab.
- In the upper right corner of the screen, click + Create Backup Schedule. The “Create Backup Schedule” window appears.
NOTE
Just as with the Backup/Restore tab, you may see an alert in this window indicating that your host might not have enough disk space to create a new backup file. This will not prevent you from creating your backup schedule and initiating backup operations as specified, but we recommend that you free up disk space on your host machine as necessary before proceeding.
- Verify that the Enabled option is selected.
- You can still save a backup schedule without enabling it, but doing so prevents the Security Console from performing scheduled backups.
- Choose a start date.
- This will default to today’s date, but you can choose a date in the future if necessary.
- Specify the time of day that the Security Console will perform the backup.
- Specify a “Cancel Backup” time limit.
- The Security Console will not start a backup procedure if the local Scan Engine is currently in use. The “Cancel Backup” function allows the Security Console to cancel a scheduled backup if it’s unable to start it within the time limit you specify here. A value of
0ensures that the Security Console will wait as long as it needs to before starting the backup process.
- The Security Console will not start a backup procedure if the local Scan Engine is currently in use. The “Cancel Backup” function allows the Security Console to cancel a scheduled backup if it’s unable to start it within the time limit you specify here. A value of
NOTE
Scans running on distributed Scan Engines do not affect scheduled database operations. However, Vulnerability Management users should verify that scans from both local and distributed Scan Engines are not running at the time of a backup operation to ensure that cloud data synchronizes properly.
- Select a frequency setting from the dropdown list, or select Other to configure your own.
- If desired, give your backup schedule a description for reference purposes.
- If you intend to restore the Security Console on a different host, make sure the Platform-independent box is checked.
- Finally, check the Pause all local scans before starting box if you want your backup to always run immediately at its scheduled time.
- When enabled, this option pauses all local Scan Engine scans so the backup can start. Any paused scans must be resumed manually. This option functionally overrides any “Cancel Backup” value that you set earlier.
- Click Save when finished.
Restore a Local Backup
If you already have an existing backup on your host machine and want to restore the Security Console to that state, follow these steps:
- In your Security Console, expand the left menu and click the Administration tab, and click Database > Backup and Retention.
- Click the Backup/Restore tab.
- In the “Restore Local Backup” section, browse to your desired backup in the provided table and click the icon in the “Restore” column. A dialog box will appear asking for confirmation.
NOTE - Restoring a backup from a remote location
If you elect to restore a backup from a remote location other than the local backup directory, note that the Security Console can only upload and restore remote backups that are a maximum of 2GB in size.
If your remote backup file exceeds this size limit, you’ll need to move the backup file to the local /backups directory to restore it.
- Click Restore System to continue.
As noted in the pre-backup and restore checklist, the Security Console will prompt you for your original keystore password if your current keystore password does not match.
-
If prompted, enter the keystore password associated with the backup you are trying to restore and click Restore.
- If necessary, click Restore (No Password) to restore without providing the original keystore password. For security reasons, this method prevents your saved site credentials from being restored.
Your Security Console will restart in maintenance mode while the restore process takes place. Global Administrators can log in to the Security Console to view the restore tasks as they progress. The Security Console will automatically restart when the restore completes successfully.
IMPORTANT
If the restore is unsuccessful for any reason or if the Security Console does not restart automatically, contact Rapid7 Support .
- Finally, reset any external authentication resources if you had them configured previously:
- LDAP - Restart your Security Console after the restoration completes to reestablish communication with your LDAP server.
- SAML - Respecify your Base Entity URL and reimport the metadata from your IdP. Fully restart your Security Console before allowing users to connect through your IdP again.
- Verify that all your restored content is available, such as your sites and scan templates.
Configure Backup Retention
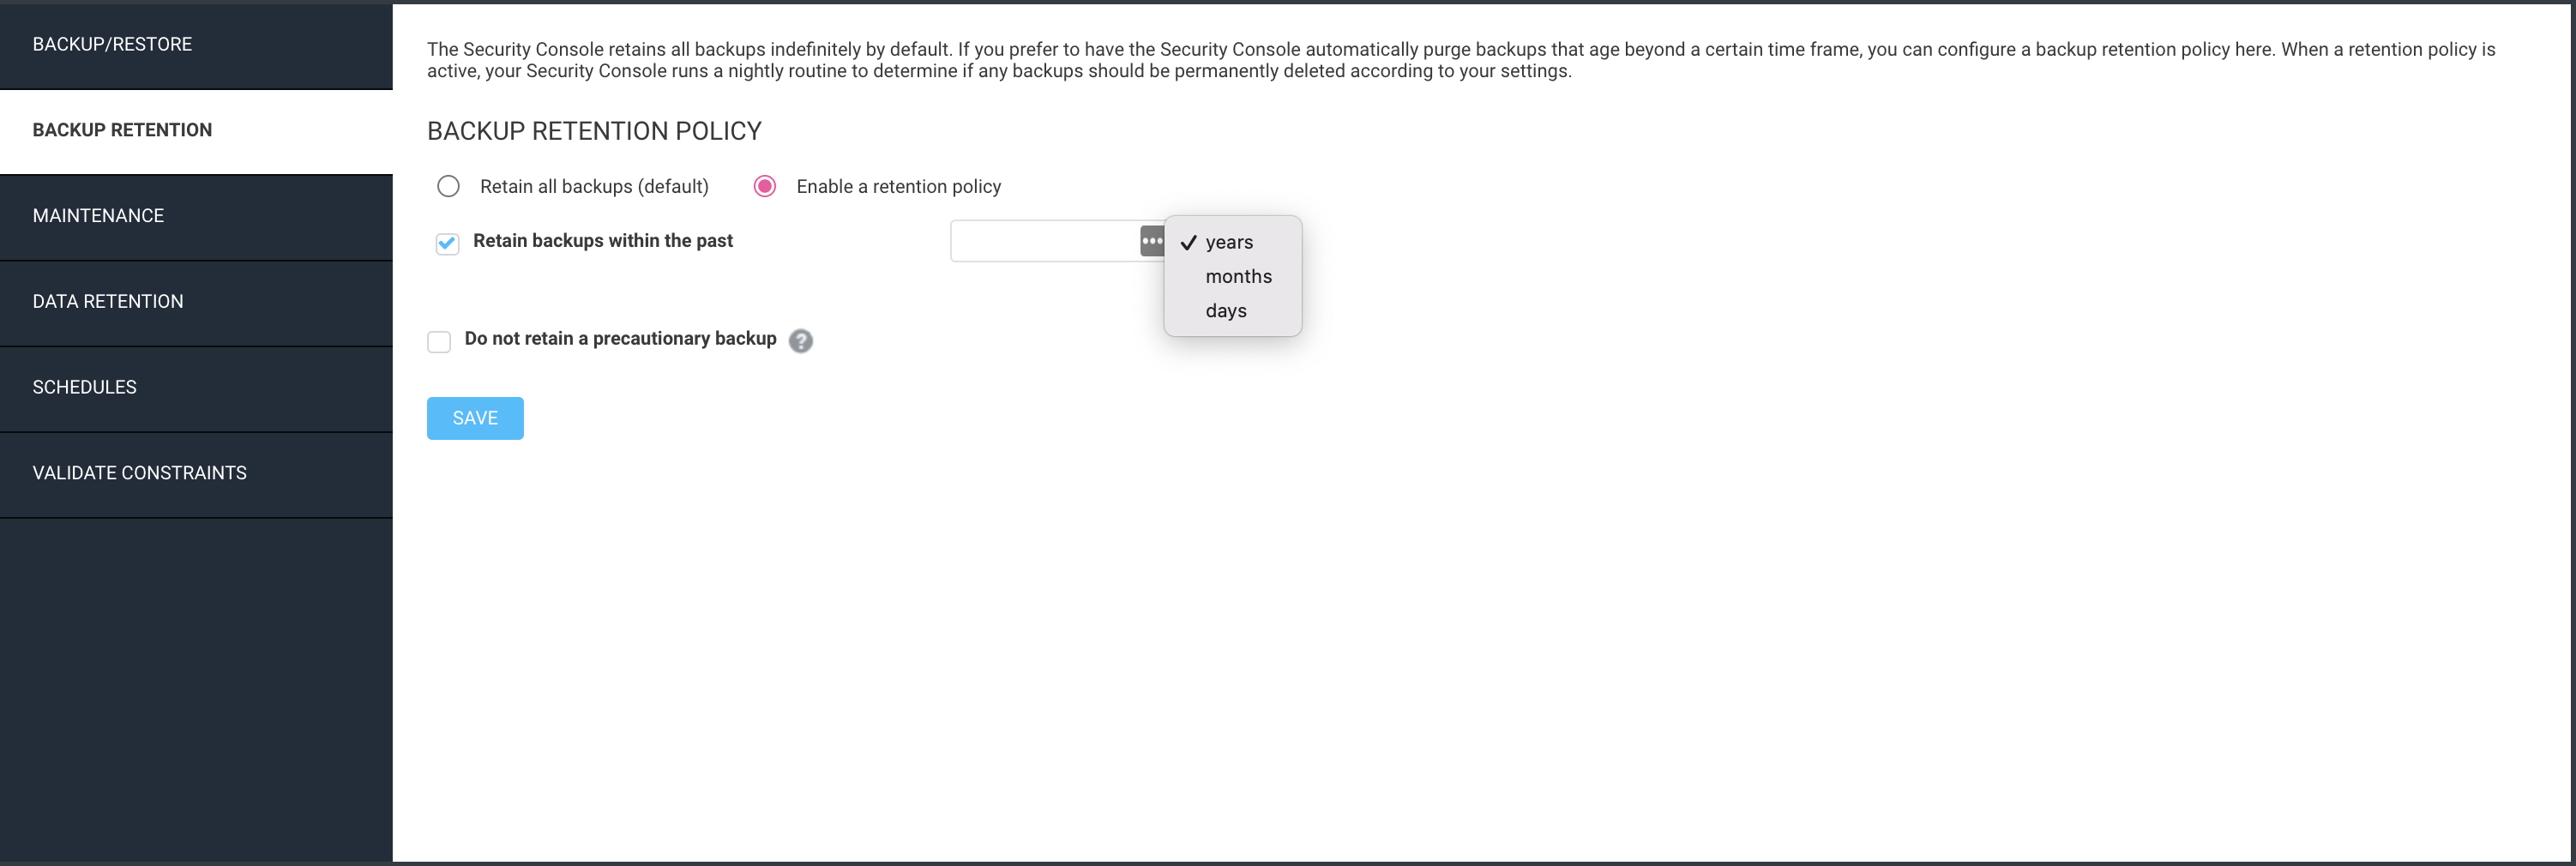
The Security Console retains all backups indefinitely by default. If you prefer to have the Security Console automatically purge backups that age beyond a certain time frame, you can configure a backup retention policy here. When a retention policy is active, your Security Console runs a nightly routine to determine if any backups should be permanently deleted according to your settings.
To configure backup retention:
- Select Administration Database > Backup and Retention.
- In the Backup Retention Policy section select one of the following:
- Retain all backups
- Enable a retention policy. If you choose to select the enable a retention policy, the retain backups within the past is immediately checked marked and you must select a time frame (years, months or days). You also have the option to select do not retain a precautionary backup.
- Click save.
Configure Data Retention Settings
By default, the Security Console retains all scan, report, asset, and agent data indefinitely. To optimize performance and disk space, you can change this policy by modifying the retention settings for each data type according to your organizational requirements.
Custom data retention settings rely on a period of time in days, months, or years that you specify for each data type. After the relevant data ages beyond the time frame you configure, the Security Console purges it from the database.
Selectable data types are as follows.
Scan Data
Scan data consists of the results of your completed scans. Configuring a retention setting for scan data ensures that any historical scan or agent assessment data older than the time frame specified will be purged. The Security Console uses the scan completion date as a basis for scan data retention.
Report Data
Report data consists of all your generated reports. Configuring a retention setting for report data ensures that any generated report older than the specified time frame will be purged.
Asset Data
Asset data consists of the following objects:
- IP address
- Hostname
- MAC address
- Vulnerabilities
- Risk score
- User-applied tags
- Site membership
- Asset ID
- The asset ID is a unique identifier applied by the Security Console when the asset data is integrated into the database.
Configuring a retention setting for asset data ensures that any asset that was not scanned within the specified time frame will be purged. However, note that asset data retention settings do not affect historical scan data. Assets removed as a result of asset data retention settings will still remain in trending data sets if they were present in earlier scans.
TIP
Assets purged by asset data retention settings will no longer count against your product license limit.
Agent Data
Agent data consists of any assets in your Security Console that have the Rapid7 Agent (Insight Agent) installed. Configuring a retention setting for agent data ensures that any agent-related assets that have not synchronized with the Security Console within the time frame specified will be purged. Similarly to asset data, agent data retention settings do not affect historical scan data.
NOTE
In order to optimize the data integration process for those assets assessed by the Rapid7 Agent (Insight Agent), the Security Console only integrates and stores agent assessment data if it differs from the previous agent assessment. In other words, the Security Console will not record two identical agent assessments in a row, but it will update the last scan completion date.
Given this condition, be aware that any agent-related assets that are removed as a result of agent data retention settings may not re-appear after subsequent assessments unless the assessment returns data with changes.
To configure a custom data retention policy:
- In your Security Console, expand the left menu and click the Administration tab, and click Database > Backup and Retention.
- Click the Data Retention tab.
- Click the Retain only data within a specific time frame radio button to make the data type checkboxes clickable.
- Check any and all data types as needed and configure a time frame for each.
- Click Save when finished.
After saving your policy, the Security Console will run a nightly routine where it will remove data that falls outside the retention time (or times) that you set. This routine begins at 12:00AM and will not interrupt your normal Security Console operations. If the routine itself is interrupted, it will resume where it left off the following evening. The overall duration of this routine depends on how much data is targeted for removal.
IMPORTANT
You cannot stop the purge routine once it has started. Be aware that all data removed by this routine is permanent and not retrievable.