Discovering Amazon Web Services instances
The Amazon Web Services (AWS) Asset Sync Dynamic Discovery connection gives you continuous visibility into the virtual servers (known as EC2 instances) in your AWS environment. There are a number of benefits to using the AWS Asset Sync Dynamic Discovery connection:
- AWS might move your workloads to a new host from time to time. The AWS Asset Sync discovery connection keeps track of these changes, ensuring you always know and can scan the EC2 instances running your workloads.
- In many AWS environments, features like auto-scaling mean the number of active EC2 instances can change minute-by-minute. The AWS Asset Sync discovery connection ensures you always have an accurate picture of how many EC2 instances are running. This is especially important to make sure you don’t have stale data on terminated EC2 instances that could distort the data you’re seeing in Vulnerability Management.
- Many organizations use EC2 tags to convey important contextual information about an EC2 instance. The AWS Asset Sync discovery connection can import these tags into Vulnerability Management, making it easier for you to organize and evaluate your EC2 instances.
It’s important to note that while the AWS Asset Sync discovery connection provides visibility into what EC2 instances exist in your AWS accounts, it does not assess the instances for vulnerabilities. For that, you will still need to run scans or embed the Rapid7 Agent (Insight Agent) in your EC2 instances.
ARN support for this discovery connection
Each AWS Asset Sync connection can support up to 1000 Amazon Resource Names (ARNs) for discovery across AWS accounts.
Prepare for Dynamic Discovery in an AWS environment
The following sections detail what steps you need to take before you can create an AWS Asset Sync discovery connection.
Check connectivity requirements
You must allow your Security Console to establish TCP connections to your EC2, STS, and CloudTrail endpoints for the Asset Sync discovery connection to function properly. Check the following AWS Regions and Endpoints document to find the endpoint URLs that correspond to the region where your Amazon services are hosted:
https://docs.aws.amazon.com/general/latest/gr/rande.html
Create an IAM user or role
When setting up a discovery connection with AWS, you must create either an IAM user or role in order to give the Vulnerability Management Security Console access to your EC2 API. Whether you should create an IAM user or create an IAM role depends on if your Security Console is running on a host that’s inside or outside of your AWS environment.
Security Console running in AWS
If your Vulnerability Management Security Console is running on an AWS EC2 instance, then you should create an IAM role for your AWS Asset Sync discovery connection to use. When setting up your new role, you can skip the step where you are asked to attach a permissions policy - this will be added later. Once you’ve created your new role, attach it to the EC2 instance that your Security Console is running on. By attaching the IAM role directly to the EC2 instance running the Security Console, you enable the Security Console to automatically generate a new set of one-time credentials whenever it connects to the AWS API.
Once you create your IAM role and attach it to the EC2 instance your Security Console is using, follow the instructions to create and attach an IAM policy to it, which will give the role the permissions necessary to access the appropriate API information. After you’ve attached your IAM policy, you’re ready to create an AWS Asset Sync connection in Vulnerability Management.
AWS Asset Sync discovery connection configuration requirements
If you are running your Security Console in AWS and you want to use an IAM role to grant Dynamic Discovery the access it needs, make sure the Console Inside AWS option is checked when you configure the AWS Asset Sync discovery connection. This will tell Dynamic Discovery to use the Instance Profile attached to the EC2 instance running your Security Console. When using an IAM role, there is no need to enter any credentials - new single-use credentials will be generated automatically each time the Security Console connects to the AWS API.
Security Console running outside AWS
If you have your Vulnerability Management Security Console running on a host that is outside of AWS, then you should create an IAM user for your AWS Asset Sync connection to use. When creating the new IAM user, make sure that you check the Programmatic Access box. This means that IAM will create an access key that the discovery connection can use as credentials to access the AWS API. You can also skip the step where you are asked to attach a permissions policy - this will be added later.
When you create the new user, you will be shown the access key for the user. The access key consists of an access key ID and a secret access key. Write these down or download the CSV containing these credentials. You will be asked for them when you set up your AWS Asset Sync connection. Be sure to keep them secure - they are the equivalent of a username and password.
Once you create your IAM user, follow the instructions to create and attach an IAM policy to it, which will give the user the permissions necessary to access the appropriate API information. After you’ve attached your IAM policy, you’re ready to create an AWS Asset Sync connection in Vulnerability Management.
Access key rotation guidance
Since an access key acts as a set of credentials, it is a best practice to rotate them at least every 90 days. When you rotate them, make sure to also update your AWS Asset Sync connection to use the new access key ID and secret access key.
Attach a policy to your IAM user or role
In order for the AWS Asset Sync discovery connection to work, the Security Console must be able to list EC2 instances and monitor CloudTrail for instance-related events.
To do this, you must create a new policy and paste in the following JSON:
{
  "Version": "2012-10-17",
  "Statement": [{
    "Effect": "Allow",
    "Action": [
      "cloudtrail:LookupEvents",
      "cloudtrail:DescribeTrails"
     ],
     "Resource": "*"
   },
   {
     "Effect": "Allow",
     "Action": [
       "ec2:DescribeInstances",
       "ec2:DescribeImages",
       "ec2:DescribeAddresses",
       "ec2:DescribeNetworkInterfaces"
     ],
     "Resource": "*"
  }]
}
Once you’ve created your new policy, attach it to the IAM role or the IAM user that you have already created and proceed to create an AWS Asset Sync connection.
Connect to multiple AWS accounts
Users of the AWS Asset Sync connection can leverage AWS AssumeRole to decide which assets across all their AWS accounts to include in a single site. AssumeRole is available to Security Consoles within and outside of the AWS environment. To use STS AssumeRole the user must also have a policy similar to the following:
{
  "Version": "2012-10-17",
  "Statement": {
    "Effect": "Allow",
    "Action": "sts:AssumeRole",
    "Resource": "arn:aws:iam::ACCOUNT-ID-WITHOUT-HYPHENS:role/Test*"
  }
}
If you are using STS Assume Role in a cross-account scenario, the role in the secondary account will need the EC2:Describe policy, the CloudTrail policy, and a trust relationship with the principal account. More information about using STS Assume Role for cross-account access can be found in the AWS documentation here and here .
Scan Engines inside or outside AWS
It is a best practice to scan AWS instances with a Scan Engine that is deployed within your AWS environment. This allows you to scan private IP addresses and collect information that may not be available with public IP addresses, such as internal databases.
If your Scan Engine is inside the AWS network, the Security Console will discover and scan assets using their private IPs.
If the private IP space in your AWS network overlaps with the private IP space in your corporate network, some assets in AWS may share the same IP address as assets in your corporate network.
If your Scan Engine is outside the AWS network, the Security Console will only scan assets with Elastic IP (EIP) addresses assigned to them. The Security Console will use these EIPs when scanning. You will not be able to manually edit the asset list in your site configuration or in a manual scan window. Dynamic Discovery will include instances without EIP addresses, but they will not appear in the asset list for the site configuration.
Add an AWS Asset Sync Connection
Included Assets for AWS sites
Note that modifying the Included Assets for AWS sites may break the connection.
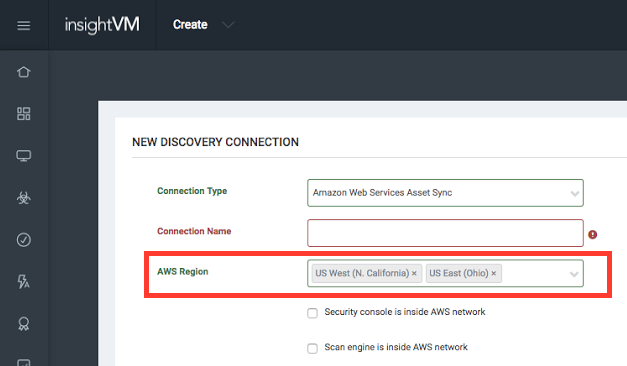
All discovery connections should be configured through Administration > Assets > Discovery > Manage asset discovery connections. Make sure that you select the Amazon Web Services Asset Sync option from the Connection Type dropdown.
Site requirements
AWS Asset Sync discovery connections require a static site.
- Enter a unique name for the new connection.
- From the dropdown list, select the geographic region where your AWS instances are deployed. A single connection can specify multiple regions, if necessary.
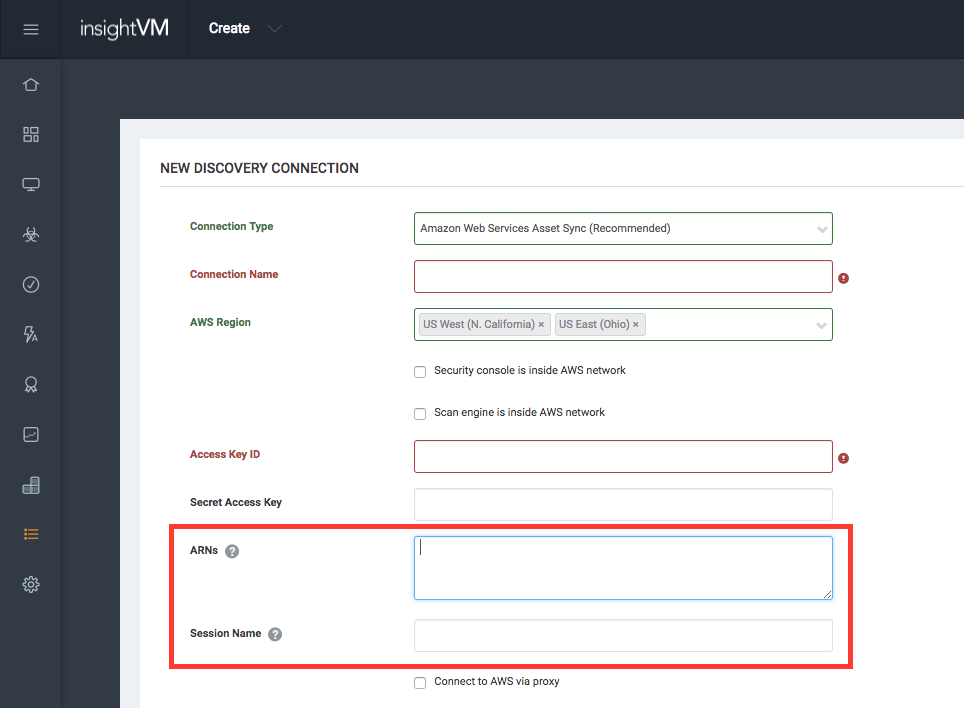
- If the Security Console is deployed inside the AWS network, select the appropriate check box. If you indicate that the Security Console is inside the AWS network, the Credentials link disappears from the left navigation pane. You do not need to configure credentials, since the AWS API recognizes the IAM role of the AWS instance that the Security Console is installed on.
- If the Scan Engine you will use to scan the AWS environment is deployed inside the AWS network, select the appropriate check box. This will enable the application to scan private IP addresses.
- Enter an Access Key ID and Secret Access Key with which the application will log on to the AWS API.
- If you are using AWS AssumeRole for cross-account access, enter one role ARN per line and an optional Session Name for the assumed role session. The session name is a string of characters consisting of upper- and lower-case alphanumeric characters with no spaces. You can also include underscores or any of the following characters:
=,.@-
Entering multiple ARNs
When multiple ARNs are present, the application will iterate over each ARN and attempt to import assets from the region(s) specified.
- If desired, click Test Credential to confirm that the connection is successful.
- Select Synchronize Amazon Web Services Asset Sync assets to import AWS assets and remove stale assets.
- Select a site to associate the assets with. To exclude specific assets from being imported, enter the tags in the Do not import assets with the following tags box. The format is
key:value + key:value +...If this box is empty, all assets are imported. - Select Import tags to import all Amazon Web Services tags. To include specific tags, enter these tags in the Only import the following tags box. The format is
key:value + key:value +...If this box is empty, all tags are imported. AWS tags are imported as custom tags on the corresponding asset, and can be easily identified by the prefixAmazon-web-services.
Default Tag Creation
By default, and regardless of the state of the Import Tags check box, the AWS Asset Sync connection will create a Security Console tag based on the imported VPC ID of the instance.
- Click Save.