Remediation Projects
Remediation projects allow teams to coordinate on the progress of remediation initiatives by providing visibility into the responsibilities of security and IT teams so that they can easily track and measure the progress of remediation work.
Benefits of remediation projects
A remediation project is a group of solutions for vulnerabilities that need to be remediated on a specific set of assets within a certain time frame. When you create a remediation project, the Security Console applies an algorithm to identify solutions and aggregates the risk by solution to determine the remediation actions that will reduce the most risk.
Remediation projects make it simpler to prioritize, drive, and track remediation progress by showing you the true state of the remediation. Project metrics automatically update as known vulnerabilities are no longer found, so that you can fully visualize the achievements of your remediation teams.
With remediation projects, you can:
- Communicate relevant context and prioritizations to the right people
- Track the progress of remediation projects
- Identify the remediation work that teams are working on at a glance
- Automatically identify, assign, and monitor remediation progress
Understanding remediation projects
A project is made up of assets and remediations. Project results depend on the outcome of the remediation process. Below is an overview of the Remediation Projects workflow:
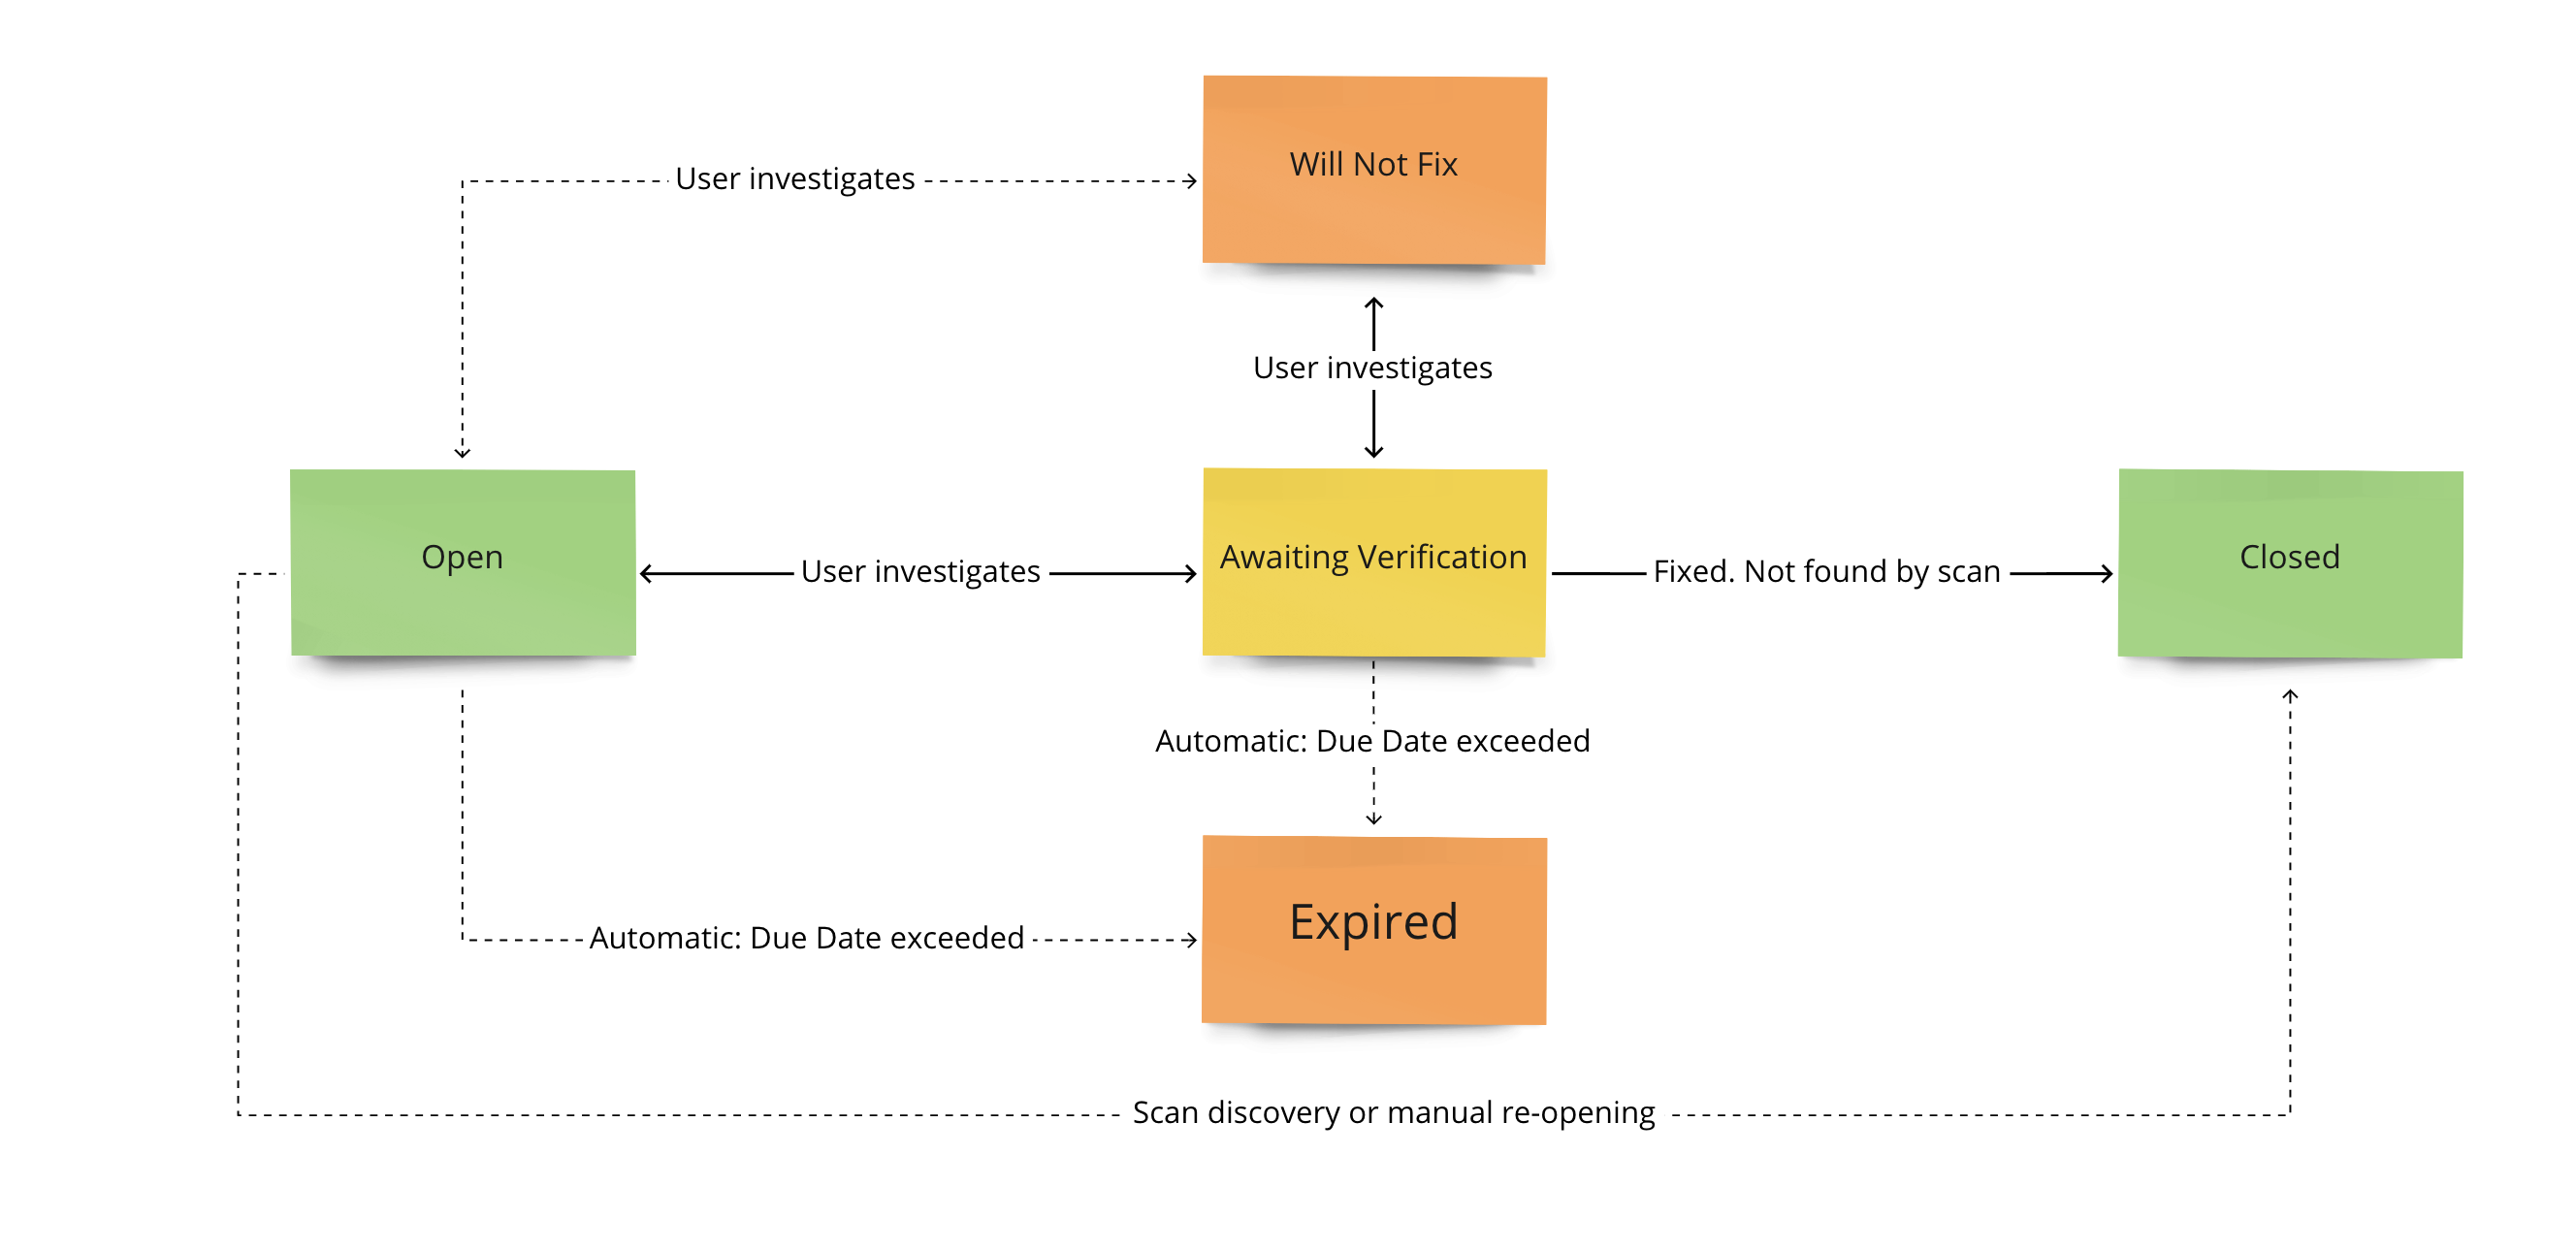
Understand the statuses
The following statuses refer to the states a project can be in as you move through the remediation process.
Remediation statuses
| Status | Description |
|---|---|
| Open | Assets are still vulnerable as no action has been taken or solution applied. Verification and remediation needed. |
| Awaiting Verification | Users can set this status to indicate that a solution has been applied. After the scan runs the status will either change to Closed or it will revert back to Open, depending on verification and remediation. |
| Will Not Fix | Users can set this status to note that a solution will not be applied. Setting a remediation to Will Not Fix, recalculates the project’s risk score. Users may occasionally see a system-only workflow state called Pending Will Not Fix. |
| Closed | The project is closed and will no longer receive updates. All necessary action has been taken, determined either by the user or through hey remediation. |
| Reopen | Solutions that were previously closed but have been reopened because all necessary actions have yet to be taken. This status only applies to organizations that have ticketing enabled . |
| Unknown Solution | Some solutions are classified as unknown as there is not a sufficient level of certainty for a solution given a specific vulnerability. |
Ticket Integrations
If you are looking for more information on ticket integration refer to Ticketing Integration for Remediation Projects
Project statuses
| Status | Description |
|---|---|
| Open | Projects that have not yet reached expiration or been set to Closed by the user. Open projects continue to update as the user applies solutions and scans assets. An Open project can either be New or in a Re-opened state if the vulnerability still exists. If there was a ticket created by the ticketing integration, a new ticket will be created and the status will be Open. |
| Expired | Projects automatically update to the Expired status after a project has passed its due date. Expired projects will no longer receive updates, even if the user applies a solution to assets in the project. |
| Closed | Projects that are manually set to Closed by the user. Closed projects no longer receive updates even if the user applies a solution to assets in the project. Projects are either closed because the vulnerabilities found have been remediated or they have been determined to not be a threat. |
Remediation projects permissions
Only global administrators can create new static and dynamic remediation projects (from both the Remediation Projects interface and the Query Builder), and edit or delete all existing projects, regardless of ownership.
Users in the following roles can create new static remediation projects (from the remediation projects interface only) and edit those that they already own:
- Security Manager
- Site Owner
- Asset Owner
- User
You can also grant project permissions to any custom user role as long as that role has the Remediation Projects and Goals & SLAs Platform permission enabled. See the Assign a role and permissions to a user section of the Managing users and authentication article for instructions on how to do so.
Project owner
A project owner has the ability to create a project, identify the assets or vulnerabilities that are contained in the project, and assign the project to other users.
Project assignee
A project assignee is typically a remediation team member. Assignees review the solution steps, execute remediation for the specified assets, and update the status of the solutions.
Create a remediation project
On the Remediation Projects page, click Create a Project to start the project creation wizard.
Provide your project with some basic information.
Specify the project scope.
- Determine whether your project will be Static or Dynamic.
- Use the Query Builder to define the project solution scope by loading an existing query or creating a new one.
- Preview the included asset and vulnerability records by clicking under the Project Scope field.
Assign the project to members of your security team.
- Expand the assignment dropdown to select one or more Vulnerability Management (InsightVM) users that will work on this project.
- If desired, check the permission box to allow users without Vulnerability Management (InsightVM) credentials to access the project via email.
- Determine what level of access your assignees will have to the project details.
- Set a due date for the project. Expired and closed projects will not receive updates.
- Review your project details.
- Save and Complete the wizard when finished.
Additional remediation project creation resources
Project creation wizard alternative
You can also start the project creation wizard from the expanded view of applicable cards. See Cards to learn more.
The difference between static and dynamic projects
-
Static projects - Lock asset and solution membership after you initially create them. Their scope does not change unless you delete asset members from the Security Console. However, the solutions in a static project can add applicable assets as long as those assets were already project members. Static projects are commonly used for addressing specific asset and vulnerability groups.
-
Dynamic projects - Automatically add solutions as conditions change in your network. Unlike static projects, you can also modify the scope of a dynamic project after you create it. To help you visualize your progress, dynamic projects do not remove solutions as you remediate, but will remove solutions if you elect to change the scope. You can remove assets when the scope of the project changes, such as when you remove tags, sites, or asset groups. The system removes assets from the project list after all of the relevant vulnerabilities have been remediated. Dynamic projects are commonly used for ongoing maintenance, such as the remediation of any assets that surpass a certain level of risk.
Automated ticketing configuration
See Ticketing Integration for Remediation Projects to learn how to configure a new ticketing integration for your project creation wizard.
Viewing a remediation project
Open the Remediation Projects page from the left navigation bar to access a list of remediation projects. You can also view a list of projects immediately after creating a new project.
View project details
Click within a project row to view expanded summary, solution, asset, and vulnerability information. Each row represents an individual remediation project.
View solutions details
Click on a project name to open the solutions view. This view displays an overview of details such as owner information, remediation steps, assets affected, and assignee information. Click on a solution row to expand the view for additional details on individual solutions.
Measure project progress
Priority solution application metrics
| Concept | Definition |
|---|---|
| Progress | Tracks against the total number of solutions applied to the project. |
| Assets Completed (Project Overview) | Tracks the number of assets that have remediated all vulnerability findings associated with all solutions applicable to them. If any applicable solution remains unremediated, the asset will not be reflected as completed at the Project Overview level. Hover over the metric for more details. |
| Assets Completed (Solution) | Tracks how many assets have remediated all vulnerability findings addressed by this solution. |
| Assets Affected | Represents the total number of assets that a vulnerability impacts. The first number represents the amount of assets with solutions, while the number in parentheses indicates the number of assets without known solutions. |
| Solutions Resolved | Tracks the number of solutions that have been applied to all relevant project assets and those that are flagged as Will Not Fix. Assets that are flagged as Will Not Fix are no longer considered for solution application. |
Understand the metrics
Solution progress is measured by the number of solutions applied against the total number of assets. 100% progress completion signifies that all applicable solutions have been applied to all the assets within a project. Measuring progress in this way provides a holistic view of your project and makes it easier to report on the KPIs that you care about.
For example, say Solution #1 and Solution #2 are being applied to a total of 4 assets. Both solutions need to be applied to one asset before the remediation of that asset is considered complete. Solution #1 has been applied to 2 out of the 4 assets. Solution #2 has been applied to 3 out of the 4 assets. 5 out of 8 total solutions have been applied to this project (63%). Out of the 4 total assets, both solutions have only been applied to asset C. This means that the total asset completion rate is 1 out of 4. The total solutions rate is currently 0 out of 2 because neither of the 2 solutions have finished applying to all assets. Once all vulnerability instances of an asset are remediated by a solution, that solution is then considered to be “applied”.
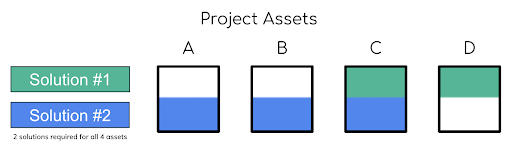
| Metric | Ratio | Percentage |
|---|---|---|
| Solutions Resolved | 0 of 2 | 0% |
| Assets Completed | 1 of 4 | 25% |
| Total Solutions Applied | 5 of 8 | 63% |
Applying solutions to multiple instances
If multiple instances of the same vulnerability occur on one asset, all instances of the vulnerability must be remediated by a solution before it is considered applied.
Combined solutions
If one solution supersedes another with its ability to remediate a vulnerability when applying multiple solutions, they will be combined to formulate what is known as a “best solution” . This eliminates vulnerabilities efficiently by utilizing the minimum number of solutions to reduce the maximum amount of risk.
Export project data to CSV
Data from the Projects and Solutions pages can be exported to a CSV file. There are five exports that can be performed:
| Concept | Definition |
|---|---|
| Project Listing Table | Exports the data for all selected projects. This export helps analyze data and track KPIs. |
| Solutions Listing Table | Contains all of the solutions within a project. This export helps to better analyze solution data, helping you understand the potential fixes that can be applied against vulnerabilities in remediation. |
| Assets | Contains the assets within the scope of a project that may have vulnerabilities and can be utilized during remediation. |
| Vulnerabilities | Communicates where solutions should be applied during remediation. |
| Remediator | Combines all of the necessary solution, vulnerability, and asset data needed for remediation into a singular export. |
Export by type
Export projects or solutions data
- Select the checkbox for each item in the listing table you want to export.
- Click Export to CSV to download.
Export vulnerability data
- Click the solution you want to view.
- In the solution drawer, click the Vulnerabilities icon.
- Select the checkbox for each vulnerability you want to export.
- Click Export to CSV to download.
Export asset data
- Click the solution you want to view.
- In the solution drawer, click the Assets icon.
- Select the checkbox for each asset you want to export.
- Click Export to CSV.
- In the dropdown, select Export Assets or Remediator Export to download.
Export projects and solutions data
Column data in both the Projects and Solutions pages can be exported to a CSV file.
- Select all desired projects or solutions by enabling their respective checkboxes.
- Click Export to CSV to download a CSV file.
Export asset and vulnerability data
From solutions, you can export Asset and Vulnerability data.
- Click the desired solution row to open the solution drawer.
- Select the Vulnerability or Asset tab.
- Enable the checkbox of each desired row.
- Click Export to CSV to download a CSV file.