Using the Scan Assistant
Using the Scan Assistant
The Scan Assistant provides you with a secure alternative for authenticated scans that utilizes elliptic curve asymmetric encryption (ECDSA) and advanced encryption standard (AES) to form a trusted secure channel between the Scan Assistant and the Scan Engine. You can deploy the Scan Assistant with a public certificate in your environment which allows the Scan Engine to receive a private certificate.
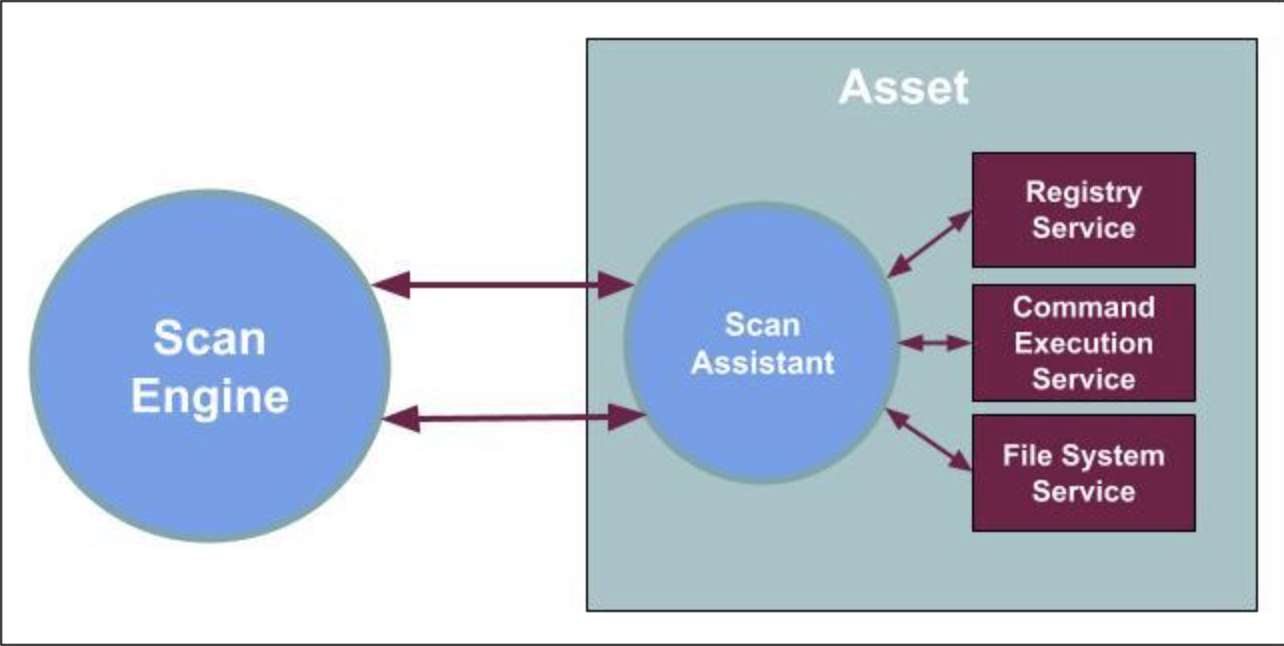
The Scan Assistant achieves the same results as a credential scan without the need for administrative credential management and provides accurate, granular vulnerability fingerprinting and assessment for assets. The Scan Assistant allows the Scan Engine to connect directly to an endpoint in order to collect data without the need for additional credentials. A secure connection is created between the Scan Engine and the Scan Assistant by using elliptic curve asymmetric encryption (ECDSA) and advanced encryption standard (AES).
Once installed, the Scan Assistant provides Registry and File System services (Windows) or a Command Execution Service (Linux) on the local asset, and only runs when scans are performed.
Why should I use the Scan Assistant?
The Scan Assistant provides a more secure way to scan your assets, removes the need for administrative credential management, consumes much fewer resources, and significantly decreases the time to complete for policy scans.
Better Security
The Scan Assistant leverages Transport Layer Security (TLS) with elliptic curve asymmetric encryption (ECDSA) and advanced encryption standard (AES) and digital certificates to create a trusted secure channel between the Scan Engine and the Scan Assistant.
No Credential Management
The Scan Assistant provides the only access needed for you to run an authenticated scan. There is no need for privileged Admin account access to assets. This means that the Scan Assistant can perform scans without the hassle of managing credentials to assets.
You do not need to use SSH, CIFS, WMI or other traditional account-based credentials alongside the Scan Assistant, since the Scan Assistant acts as your credential type. Note that the Scan Engine prioritizes the Scan Assistant over other credential types when it is present.
Efficiency
The Scan Assistant is lightweight and efficient. It consumes minimal memory and CPU resources. Once installed, the Scan Assistant provides Registry and File System (Windows) or Command Execution (Linux) services on the local asset. The Scan Assistant only runs when scans are initiated.
Faster Policy Scans
Due to the large amounts of data being collected, policy scans usually take a while to complete. With the Scan Assistant, policy scan time completion improves vastly.
When should I use the Scan Assistant?
The Scan Assistant provides an additional tool that Nexpose and Vulnerability Management (InsightVM) administrators can leverage to expand and extend enterprise vulnerability coverage. It is complementary to the Rapid7 Agent (Insight Agent), and compatible with the Vulnerability Management (InsightVM) cloud platform, but does not require cloud connectivity. The Scan Assistant provides an ideal solution for the following vulnerability coverage scenarios:
| Scenario | How the Scan Assistant Helps |
|---|---|
| Authenticated scan credentials are difficult to administer. | The Scan Assistant uses digital certificates instead of traditional administrative credentials. |
| Need more control over site parameters. | The Scan Assistant does not require Internet connectivity. |
| Concerns about agent resource utilization for mission critical assets. | The Scan Assistant is only active during scans initiated by the Scan Engine. |
| Need granular control over assessment parameters for particular assets. | The Scan Assistant responds to specific scan parameters defined by the Console to the Scan Engine. |
| Need to accelerate completion times for vulnerability and policy scans. | Compared to traditional authenticated scans, the Scan Assistant will be faster for vulnerability scans and orders of magnitude faster for policy scans. |
Resource Utilization
The Scan Assistant will occupy approximately 20MB in memory. It will consume 0% CPU when idle. CPU utilization can range from 2.5% to 6% when the Scan Assistant is active, for a duration of 60 to 120 seconds while a scan is completed.
Scan Assistant Deployment Overview
Windows
- Download the Scan Assistant software (.MSI) and the Checksum (SHA512 file).
- Create and deploy X.509 digital certificates, that will be used to establish a trusted connection between the Scan Engine and scanned assets.
- Configure and schedule scans for Sites with assets that have the Scan Assistant installed.
A Public Key (PEM) is added with the Scan Assistant software and to all supported target assets as part of the installation. A Private Key(included in a PKCS12 file) is added to the Security Console as a scan credential.
Microsoft Standard Installer (Msiexec.exe) is used to install the Scan Assistant software .MSI and one line PEM file with the /i command line parameter. Additional command line parameters can be seen by running Msiexec.exe, or found in Microsoft’s documentation. This information may prove useful in creating automated installation scripts.
Linux
- Download the Scan Assistant packages (.DEB or .RPM) and Checksum (SHA512 files).
- Create and deploy X.509 digital certificates, that will be used to establish a trusted connection between the Scan Engine and scanned assets.
- Configure and schedule scans for Sites with assets that have the Scan Assistant installed.
A Public Key (PEM) is added with the Scan Assistant software and to all supported target assets as part of the installation. A Private Key (included in a PKCS12 file) is automatically added to the Security Console as a scan credential.
Standard Linux Package Managers for Debian (.DEB) or Red Hat Linux (.RPM) distributions are used to install the Scan Assistant software. Be certain to use the appropriate package for your Linux variant. A one line PEM file automatically generated via the Rapid7 Security Console will be pasted into the Scan Assistant config.json file in each scanned asset. Alternatively, the PEM file may be placed in the same directory as the config.json file.
Linux Scan Assistant Credentials
Existing Windows Scan Assistant credentials may be re-used with the Scan Assistant for Linux. A single set of Scan Assistant credentials can be shared across Windows and Linux assets.
Uninstall the Early Access binary version of Scan Assistant
If you installed the Scan Assistant using binary for the Phase I Early Access version and you would like to use the Scan Assistant package manager version instead, you must first uninstall the binary version.
Linux Scan Assistant Credentials
Existing Windows Scan Assistant credentials may be re-used with the Scan Assistant for Linux. A single set of Scan Assistant credentials can be shared across Windows and Linux assets.
Uninstall the Early Access binary version of Scan Assistant for Linux
If you installed the Scan Assistant using the binary provided for the Early Access version and you want to use the Scan Assistant package manager version instead, you must first uninstall the binary version.
Installing and configuring for Windows
Supported Windows Platforms
The Scan Assistant supports the following platforms:
- Windows 10
- Windows 11
- Windows Server 2016
- Windows Server 2019
- Windows Server 2022
- Windows Server 2025
Installing the Scan Assistant on Operating System versions that are End of Support
If you decide to install the Scan Assistant on an Operating System version that is End-of-Life with an OS Vendor, understand that we will only provide minimal support, defects will not be addressed, and engineering fixes will not be issued unless supported OS versions have the same issue. Create a support ticket to report the specified issue or expect engineering to fix the defect.
Task 1: Download the Windows Installer and Checksum
Before setting up the Scan Assistant, you must download the MSI and checksum .
Task 2: Add port to Service Discovery and Asset Discovery
You must add TCP port 21047 to both Service Discovery and Asset Discovery for all scan templates before setting up the Scan Assistant.
Task 3: Generate the Scan Assistant Credentials
You can generate the Scan Assistant credentials in the Vulnerability Management Console, or manually create them. When generating new Scan Assistant credentials, previous credentials are not automatically deleted. You can set up automatic certificate rotation or delete your old credentials.
Windows credentials are not necessary to use with the Scan Assistant
Windows credentials are not necessary to use alongside the Scan Assistant because the Scan Assistant acts as your credential type.
To generate Scan Assistant credentials in the Security Console:
- Go to Administration > Shared Credentials and click New.
- On the General tab, enter a unique name and description.
- On the Account tab, in the Service field, select Scan Assistant.
- Select the Generate checkbox. By selecting this checkbox, your scan credentials are automatically generated once the credential is saved.
- On the Site Assignment tab, specify what sites can use the credential.
- To allow all sites to access the credential, select Assign these credentials to all current and future sites.
- To select a specific set of sites to access the credential, click Select Sites, select the sites you want to allow to use the credential, and click Add Sites.
- Click Save. You are redirected back to the Administration page.
- Select your newly created Scan Assistant shared credential and go to the Account tab.
- Copy the automatically generated
.pemunder PEM Format Public Certificate.
Task 4: Install the Scan Assistant on Windows
1. Deploy to an asset
Depending on your preferred tool, enter one of the following where PEM is the one-line .pem you generated in the previous step:
- In the command prompt, navigate to your msi and enter:
msiexec /i ScanAssistantInstaller.msi CLIENT_CERTIFICATE="PEM" - In PowerShell, navigate to your msi and enter:
msiexec /i ScanAssistantInstaller.msi CLIENT_CERTIFICATE="PEM"
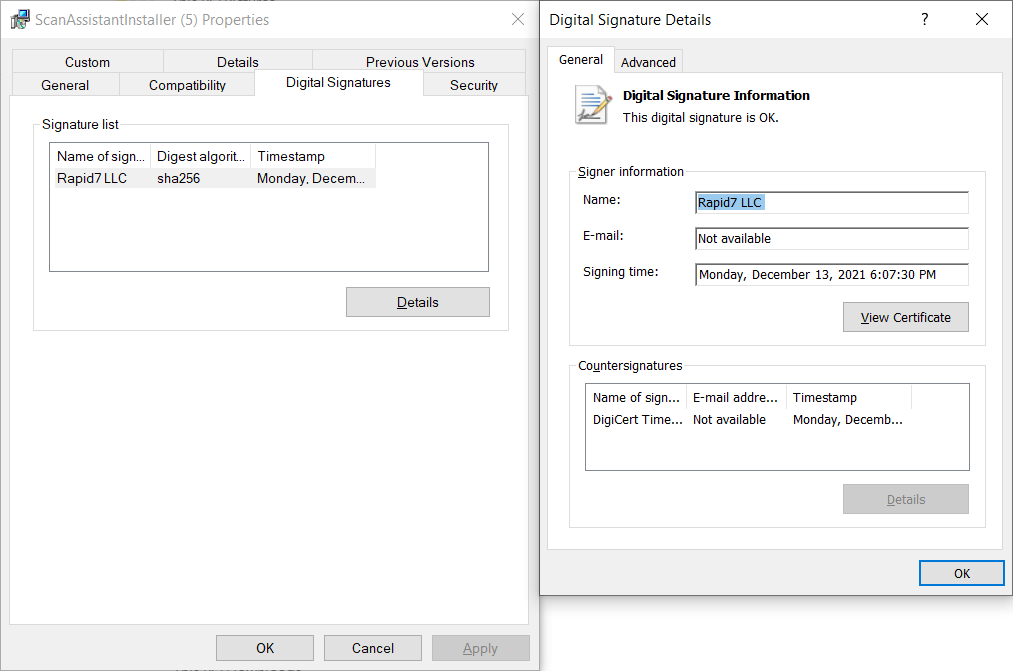
2. Verify the installer digital signature
To verify that the digital signature on the Scan Assistant Installer is valid, right-click on the installer and click Properties > Digital Signatures. The name of the signature should be Rapid7 LLC.
Asset Configuration Details
When installed, the Scan Assistant automatically configures the required parameters on the asset. It adds itself as a service that starts automatically and adds itself to the Windows firewall, listening on TCP port 21047. It also adds itself as an event source to the Windows eventlog and supports audit logging when required. When uninstalled, the Scan Assistant removes all changes made to the asset.
The following table shows additional Windows asset configuration.
| Item | Details |
|---|---|
| Process Name | ScanAssistant.exe |
| Default Installation Path | C:\Program Files\Rapid7\Vulnerability Management (InsightVM)\ScanAssistant |
| Registry Configuration | HKLM\SOFTWARE\Rapid7\Vulnerability Management (InsightVM)\ScanAssistant |
| Service Display Name | Rapid7 Scan Assistant |
| Service Name | r7ScanAssistant |
| Service Listener Port | 21047 TCP |
| Service Registry Configuration | HKLM\SYSTEM\CurrentControlSet\Services\R7ScanAssistant |
| Enable Enhanced Application Logging (set value to 1) | HKEY_LOCAL_MACHINE\SOFTWARE\Rapid7\Vulnerability Management (InsightVM)\ScanAssistant\Debug |
| PEM File | HKLM\SOFTWARE\Rapid7\Vulnerability Management (InsightVM)\ScanAssistant -> ClientCertificate |
Asset deployment Notes
When the Scan Assistant is used, the following configurations and services that may have been required on the target Windows assets to enable traditional credentialed scans are no longer needed:
- Remote access to an Administrative account
- Remote access to built-in Windows services
- Enable the Windows Registry services
- Enable the WMI service
- Enable the WinRM service
- Enable File & Print sharing, or equivalent services
Installing and configuring for Linux
Scan Engine version
Scan Assistant for Linux requires your Scan Engine to be at 6.6.153 or higher.
Supported Linux Platforms
The Scan Assistant for Linux should install on any Linux distribution that supports Debian (.DEB), Red Hat (.RPM) Package Managers, systemd or upstart Service Managers.
Linux distributions that have been tested are listed in the table below. Note that the Scan Assistant for Linux may also install on other Linux distributions that meet the criteria listed above.
Installing the Scan Assistant on Operating System versions that are End of Support
If you decide to install the Scan Assistant on an Operating System version that is End-of-Life with an OS Vendor, understand that we will only provide minimal support, defects will not be addressed, and engineering fixes will not be issued unless supported OS versions have the same issue. Create a support ticket to report the specified issue or expect engineering to fix the defect.
Linux distributions by service manager and package manager
| Linux Distribution | Service Manager | Package Manager |
|---|---|---|
| Amazon Linux 2 (64-bit) | systemd | .RPM |
| Red Hat Enterprise Linux 8 (64-bit) | systemd | .RPM |
| Red Hat Enterprise Linux 9 (64-bit) | systemd | .RPM |
| Red Hat Enterprise Linux 10 (64-bit) | systemd | .RPM |
| SUSE openSUSE (64-bit) | systemd | .RPM |
| Ubuntu Linux 16.04 (64-bit) | upstart | .DEB |
| Ubuntu Linux 18.04 (64-bit) | upstart | .DEB |
| Ubuntu linux 20.04 (64-bit) | systemd | .DEB |
| Ubuntu linux 22.04 (64-bit) | systemd | .DEB |
| Ubuntu linux 24.04 (64-bit) | systemd | .DEB |
Task 1: Download Scan Assistant for Linux Packages and Checksums
Before setting up the Scan Assistant, you must download the appropriate package and checksum for your Linux distribution and package manager.
-
Download the Debian (.DEB) package and checksum .
-
Download the .RPM / Redhat Package Manager (.RPM) and checksum .
Key file locations
- The Scan Assistant binary can be found at the following path:
/usr/sbin/ScanAssistant. - The Scan Assistant configuration file (
config.json) and asset one-line PEM file, used to authenticate the Scan Assistant’s connection, will reside in:/etc/rapid7/ScanAssistant. Theconfig.jsonfile will be automatically created as part of the installation. - Following completion of Task 2, a one-line
.pemwill be found here:/etc/rapid7/ScanAssistant. This.pemwill act as a certificate, allowing the Scan Assistant to function on your machine.
Task 2: Generate the scan credentials
You can generate the Scan Assistant credentials in the Vulnerability Management Console, or manually create them.
To generate Scan Assistant credentials in the Security Console:
- Go to Administration > Shared Credentials and click New.
- On the General tab, enter a unique name and description.
- On the Account tab, in the Service field, select Scan Assistant.
- Select the Generate checkbox. By selecting this checkbox, your scan credentials are automatically generated once the credential is saved.
- On the Site Assignment tab, specify what sites can use the credential.
- To allow all sites to access the credential, select Assign these credentials to all current and future sites.
- To select a specific set of sites to access the credential, click Select Sites, select the sites you want to allow to use the credential, and click Add Sites.
- Click Save. You are redirected back to the Administration page.
- Select your newly created Scan Assistant shared credential and go to the Account tab.
- Copy the automatically generated
.pemunder PEM Format Public Certificate.
Task 3: Install the package
Linux configuration files
The Scan Assistant for Linux uses a configuration file, config.json, that contains a number of parameters that are required for the Scan Assistant to function. The config.json contains a field, PackageManager, which specifies the package manager to be used on the asset (.DEB or .RPM). This means that a single config.json cannot be used enterprise wide for Scan Assistant for Linux installations.
There are two options for the initial location of the .pem generated in Task 2 on the asset:
- You can paste the
.pemdirectly intoconfig.json - You can create a separate file located in the same directory as the
config.json:/etc/rapid7/ScanAssistant. You must call this filescan-assistant.pemto ensure functionality.
Example configuration file
{
"ClientCertificate": "",
"ResponseTimeout": 300,
"Debug": false,
"PackageManager": "deb"
 }
.DEB package installation
Debian based systems use the dpkg command to install .DEB packages.
GPG verification
You can verify the GPG signature for the following files by downloading Rapid7’s public key .
To manually import the public GPG key:
gpg --import {public-GPG-key-here}
Before you can verify the signature of the installation files, you’ll need to install the dpkg-sig utility first. To install dpkg-sig:
sudo apt-get install dpkg-sig
Finally, to verify the DEB files:
dpkg-sig -c R7ScanAssistant_amd64.deb
- In a command prompt window, change directory to where the Scan Assistant pakcage is located.
- Issue the following command:
sudo dpkg -i R7ScanAssistant_amd64.deb. - Verify the following lines are in the output:
Service action: "install"
Service action: complete
Service action: "start"
Service action: complete- If you are unable to see the output, the Scan Assistant may be installed but it is not running. Contact Support to receive assistance with this issue.
- From a command prompt, edit the configuration file located at
/etc/rapid7/ScanAssistant/config.json. The one-line PEM file that was created on the Security Console can be entered into theconfig.jsonfor theClientCertificateparameter.
Storing the client certificate separately?
The client certificate may optionally appear as a separate PEM file in the same directory. When using this method, the PEM file must be named scan-assistant.pem. If this Scan Template automatic certificate update feauture is used, the PEM file will automatically be inserted into the config.json from that point forward. The external scan-assistant.pem will remain in place as a previously used credential.
- Verify the installation:
- List installed packages:
Enter sudo dpkg-query -l | grep r7scanassistant - Check for service in memory status:
ps -ef | grep ScanAssistant
- List installed packages:
.RPM package installation
Red Hat-based systems use the rpm command to install .RPM packages
GPG verification
You can verify the GPG signature for the following files by downloading Rapid7’s public key .
To list the public GPG key installed on the machine:
rpm -qa gpg-*
To manually import the public GPG key:
rpm --import {public-GPG-key-here}
To get details about the public GPG key installed on the machine:
rpm -qi gpg-pubkey
To verify the RPM files:
rpm -K R7ScanAssistant_amd64.rpm.
- In the command prompt install
sudo rpm -ivh R7ScanAssistant_amd64.rpm. - Verify the following lines are in the output:
Service action: "install"
Service action: complete
Service action: "start"
Service action: complete- If you are unable to see the output, the Scan Assistant may be installed but it is not running. Contact Support to receive assistance with this issue.
- From a command prompt, edit the configuration file located at
/etc/rapid7/ScanAssistant/config.json. The one-line PEM file that was created on the Security Console can be entered into theconfig.jsonfor theClientCertificateparameter.
Storing the client certificate separately?
The client certificate may optionally appear as a separate PEM file in the same directory. When using this method, the PEM file must be named scan-assistant.pem. If this Scan Template automatic certificate update feauture is used, the PEM file will automatically be inserted into the config.json from that point forward. The external scan-assistant.pem will remain in place as a previously used credential.
- Verify the installation:
- List installed packages:
rpm -q R7scanassistant_amd64 -i - Check for service in memory status:
ps -ef | grep ScanAssistant
- List installed packages:
Example output of verifying installation
      json

      Name: R7ScanAssistant
      Epoch: 0
      Version: 1.2.1
      Release: 1
      Architecture: x86_64
      Install Date: Mon 15 Aug 2022 05:31:15 PM UTC
      Group:
      Size: 9151866
      License:
      Signature: (none)
      Source RPM: R7ScanAssistant.src.rpm
      Build Date: Thu 11 Aug 2022 10:21:24 PM UTC
      Build Host: AUS-MBP-6346
      Relocations: (not relocatable)
      Packager: Rapid7
      Vendor: Rapid7
      URL:
      Summary: Rapid7 Vulnerability Management (InsightVM) Scan Assistant
      Description: Rapid7 Vulnerability Management (InsightVM) Scan Assistant
Installing and configuring for macOS
Scan Engine version
The Scan Assistant for macOS requires your Scan Engine to be on version 8.35.0 or higher.
Supported macOS versions
Use the listed platforms only
While the Scan Assistant for macOS may install on other versions, they are not supported. Similarly, when installing the Scan Assistant on an Operating System version that is End-of-Life, defects will not be addressed and engineering fixes will not be issued unless supported OS versions have the same issue.
| macOS Version | macOS Version Number |
|---|---|
| macOS Tahoe | 26.X |
| macOS Sequoia | 15.X |
| macOS Sonoma | 14.X |
Task 1: Download the Scan Assistant for macOS Packages and Checksums
Before setting up the Scan Assistant, you must download the appropriate package and checksum for your machine:
- For Apple Silicon users, download the
arm64package and checksum . - For Intel users, download the
amd64package and checksum .
Key file locations
- The Scan Assistant binary can be found here:
/Applications/Rapid7 Scan Assistant.app/Contents/MacOS/scan-assistant. - The Scan Assistant configuration list (
config.json) can be found here:/etc/rapid7/ScanAssistant. Theconfig.jsonfile will be automatically created as part of the installation. - Following completion of Task 2, a one-line
.pemwill be found here:/etc/rapid7/ScanAssistant. This.pemwill act as a certificate, allowing the Scan Assistant to function on your machine.
Task 2: Generate Scan Assistant credentials
You can generate the Scan Assistant credentials in the Vulnerability Management Console, or manually create them.
To generate Scan Assistant credentials in the Security Console:
- Go to Administration > Shared Credentials and click New.
- On the General tab, enter a unique name and description.
- On the Account tab, in the Service field, select Scan Assistant.
- Select the Generate checkbox. By selecting this checkbox, your scan credentials are automatically generated once the credential is saved.
- On the Site Assignment tab, specify what sites can use the credential.
- To allow all sites to access the credential, select Assign these credentials to all current and future sites.
- To select a specific set of sites to access the credential, click Select Sites, select the sites you want to allow to use the credential, and click Add Sites.
- Click Save. You are redirected back to the Administration page.
- Select your newly created Scan Assistant shared credential and go to the Account tab.
- Copy the automatically generated
.pemunder PEM Format Public Certificate.
Task 3: Install the package
macOS configuration files
The Scan Assistant for macOS uses a configuration file, config.json, that contains a number of parameters that are required for the Scan Assistant to function. There are two options for the initial location of the .pem generated in Task 2 on the asset:
- You can paste the
.pemdirectly intoconfig.json - You can create a separate file located in the same directory as the
config.json:/etc/rapid7/ScanAssistant. You must call this filescan-assistant.pemto ensure functionality.
Example configuration file
{
  "ClientCertificate": "",
  "ResponseTimeout": 300,
  "Debug": false
}
Package installation
macOS use the installer command to install .pkg files.
To install the macOS Scan Assistant package:
- In a command prompt window, verify the package checksum for your machine:
- For Apple Silicon users:
shasum -a 512 -c ./R7ScanAssistant.amd64.pkg.sha512sum - For Intel users:
shasum -a 512 -c ./R7ScanAssistant.amd64.pkg.sha512sum
- For Apple Silicon users:
- Change directory to where the Scan Assistant pakcage is located.
- Issue the following command:
sudo installer -pkg R7ScanAssistant.pkg -target /. - Verify the following lines are included in the output:
> sudo installer -pkg ./R7ScanAssistant.amd64.pkg -target /
installer: Package name is Rapid7 Scan Assistant
installer: Installing at base path /
installer: The install was successful.- If you are unable to see the output, the Scan Assistant may be installed but is not running. Contact Customer Support to recieve assistance with this issue.
- From a command prompt window, edit the configuration file located at
/etc/rapid7/ScanAssistant/config.json. The one-line PEM file that was created on the Security Console can be pasted into theconfig.jsonbetween the quotations in theClientCertificatefield.
Storing the client certificate separately?
The client certificate may optionally appear as a separate .pem in the same directory. When using this method, the .pem must be named scan-assistant.pem. If this Scan Template automatic certificate update feauture is used, the .pem will automatically be inserted into the config.json from that point forward. The external scan-assistant.pem will remain in place as a previously used credential.
- Verify the installation:
- List installed packages:
sudo pkgutil --pkgs=com.rapid7.scanassistant - Check for service in memory status:
ps -ef | grep scan-assistant - Check package information:
sudo pkgutil --pkg-info com.rapid7.scanassistant
- List installed packages:
Example installation verification output
> sudo pkgutil --pkgs=com.rapid7.scanassistant
com.rapid7.scanassistant

> sudo pkgutil --pkg-info com.rapid7.scanassistant
package-id: com.rapid7.scanassistant
version: 1.5.1.3
volume: /
location:
install-time: 1768384014

> ps -ef | grep scan-assistant
    0 23618     1   0  9:46a.m. ??         0:00.08 /Applications/Rapid7 Scan Assistant.app/Contents/MacOS/scan-assistant
  501 23726 23538   0  9:56a.m. ttys000    0:00.00 grep scan-assistant
Re-install, upgrade, or downgrade the macOS Scan Assistant
In the event that the Scan Assistant needs to be upgraded, downgraded, or re-installed, the macOS installer command can be used along with the uninstall scripts.
Re-install or downgrade to a previous version
sudo /Applications/Rapid7\ Scan\ Assistant.app/Contents/Resources/uninstall.sh --keep-config && sudo installer -pkg /path/to/package.pkg -target /Upgrade to a new version
sudo installer -pkg /path/to/package.pkg -target / Automatic Certificate Rotation
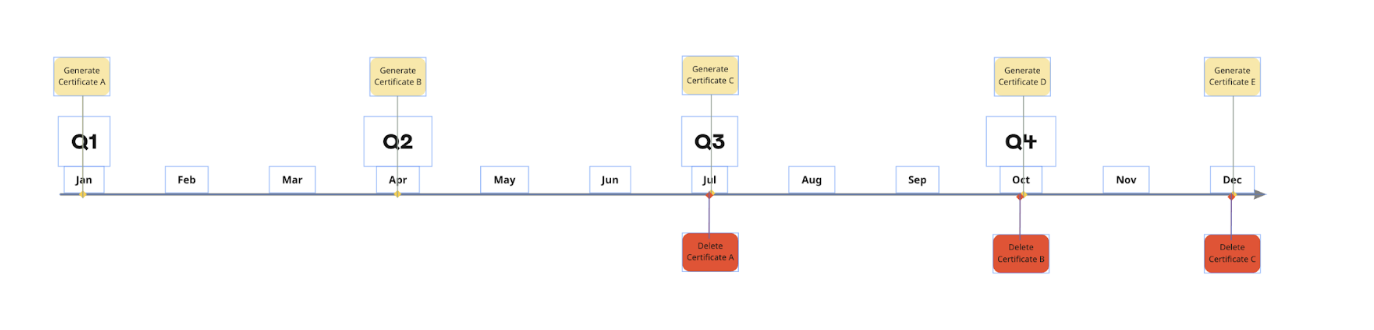
In the Scan Assistant template, you can automatically rotate your Scan Assistant certificate. When you enable certificate rotation, Vulnerability Management automatically attempts to update the Scan Assistant to use the available credential with the latest expiration date.
You can not explicitly set the expiration date for certificates that are automatically generated from the Security Console. The default validity period for certificates is three years, so the most recent certificate added will have the longest validity period. To enable the certificate rotation, you will need to create a new certificate pair from the Security Console according to your IT Security policy for digital certificate or credential rotation.
Authentication is required
Authentication is required for successful certificate updates.
Do not remove the previous credential
To avoid a lock out, do not remove the previous credential until the certificate rotation is complete.
Rapid7 recommends deleting the oldest certificate every 3rd new certificate. Keep in mind that this recommendation is not necessarily the timeframe but in accordance with your internal certificate rotation policy. The frequency of rotation is usually set by your IT Security Policy. You may choose to rotate the certificates in accordance with your Security Policy before they expire.
Scan Assistant Software Updates
When you enable automatic updates, Vulnerability Management updates the Scan Assistant with the latest installation, when available. Automatic updates are available for the Scan Assistant for Windows versions 1.1.0 and Linux versions 6.6.153. Automatic updates are also available for later versions of Windows and Linux.
- Select the Administration tab.
- Click Scans > Templates. Select the template you want to edit or click New Scan Template.
- On the Scan Assistant tab select the Rotate Certificates checkbox, to automatically rotate your Scan Assistant certificates.
- Select the Apply Updates checkbox, to automatically apply the latest updates.
- Click Save.
For optimal scan performance with the Scan Assistant, Rapid7 recommends selecting either the Automatic Certificate Rotation or the Scan Assistant Software Updates feature, but not both in the same scan template. Enabling both features in the same scan template affects the scan performance issues when a Scan Assistant update or Credential rotation occurs.
Uninstall the Scan Assistant from a Windows asset
Command line
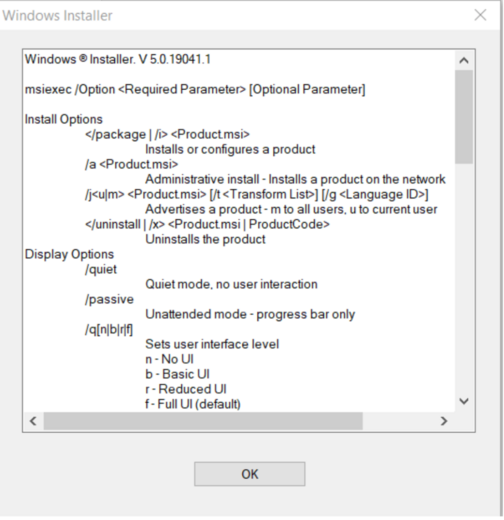
You can uninstall the Scan Assistant from a Windows asset by utilizing the command line.
The Windows Scan Assistant ships as an .msi file and uses the standard Microsoft Windows installer, msiexec.exe. Refer to Microsoft’s documentation to view all the listed command line options. Also, you can see the command line options by running msiexec from a CMD prompt on a Windows Machine.
UI
You can also uninstall the Scan Assistant from a Windows asset from Windows Explorer and the add or remove programs applet.
Windows Explorer
If you are at the keyboard of the Windows asset, you can use Windows Explorer to uninstall.
- Navigate to ScanAssistantInstaller.msi.
The location of the ScanAssistantInstaller will be based on the folder or directory you chose to place it in.
- Right click on the .msi and select Uninstall.
Programs applet
You can uninstall the Scan Assistant from the add or remove programs applet. On Windows 10, if you search for Add in the Windows search bar, you will see the add or remove programs applet.
Uninstall the Scan Assistant from a Linux asset
.DEB packages
-
From a command prompt window, issue the following command:
sudo dpkg -r r7ScanAssistant -
Verify the following lines in the command output:
Service action: “stop” Service action: complete Service action: “uninstall” Service action: complete
.RPM packages
-
From a command prompt window, issue the following command:
rpm -e r7ScanAssistant -
Verify the following lines in the command output:
Service action: “stop” Service action: complete Service action: “uninstall” Service action: complete
Uninstall the Scan Assistant from a macOS asset
In the event that you need to uninstall the macOS scan assistant, a built in uninstall script is stored at: /Applications/Rapid7\ Scan\ Assistant.app/Contents/Resources/uninstall.sh.
| Uninstallation options | Argument |
|---|---|
| Uninstall the Scan Assistant while keeping the configuration files | --keep-config |
| Uninstall the Scan Assistant and remove the configuration files | —-remove-config |
Interactive mode
The script also has an interactive mode if run with no arguments where it will ask the user if they wish to remove the config. The uninstall script must run with root permissions using sudo or run as the root user.
Example output: uninstall the Scan Assistant while keeping the configuration files
sudo /Applications/Rapid7\ Scan\ Assistant.app/Contents/Resources/uninstall.sh --keep-configExample output: uninstall the Scan Assistant and remove the configuration files
sudo /Applications/Rapid7\ Scan\ Assistant.app/Contents/Resources/uninstall.sh --remove-configExample output: uninstall the Scan Assistant with the interactive output
> sudo /Applications/Rapid7\ Scan\ Assistant.app/Contents/Resources/uninstall.sh
========================================
Rapid7 Scan Assistant Uninstaller
========================================

Stopping Scan Assistant service...
Removing LaunchDaemon...
✓ Service removed
Removing application...
✓ Application removed
Removing log files...
✓ Log files removed

Configuration files are located in: /etc/rapid7/ScanAssistant
Do you want to remove configuration files? (y/N): n
Configuration files preserved (can be manually removed later with: sudo rm -rf /etc/rapid7/ScanAssistant)

Removing package receipt from system...
Forgot package 'com.rapid7.scanassistant' on '/'.
✓ Package receipt removed

========================================
Uninstallation completed successfully!
========================================
Mass deployment
For mass deployments of the Scan Assistant for Linux a unique config.json must be created for groups of assets using each package manager (.DEB or .RPM).
The following tools may be used to automate mass installations of the Scan Assistant:
- Microsoft SCCM (System Center Configuration Manager
- Microsoft GPO (Group Policy Orchestrator)
- HCL BigFix
- Red Hat Ansible
- Intune
- PDQ Deploy
(Documentation for each tool set is available from the respective vendor.)
Frequently Asked Questions
How to manually generate a Scan Assistant certificate
Use in production environments
Browsers and clients will show security warnings for self-signed certificates. For production environments, consider using a certificate from a trusted Certificate Authority (CA).
Create the Scan Assistant certificate on Linux
Create the keys
- Open the command prompt.
- Create the private key.
- For an ECDSA key, enter:
openssl ecparam -out scan-assistant.key -name secp384r1 -genkey - For an RSA key, enter:
openssl genrsa -out scan-assistant.key 3072
- For an ECDSA key, enter:
- Create the public key. Enter:
openssl req -new -nodes -x509 -out scan-assistant.pem -key scan-assistant.key -days 3650 -subj "/O=/OU=/CN=scan.assistant.rapid7.com/emailAddress=" - Wrap the keys. Enter:
openssl pkcs12 -export -inkey scan-assistant.key -in scan-assistant.pem -out scan-assistant.p12 - Add a password to further encrypt your file.
Add credentials to the console
- From your Vulnerability Management console, click on the site that you want to enable the Scan Assistant.
- Click Authentication > Add Credentials.
- Add a name and description.
- Click Account.
- In the Service Type field, select Scan Assistant.
- In the PKCS#12 File field, select the p12 file.
- Enter your file password.
- Click Create.
- Click Save.
Create a single-line PEM
- In the command prompt, enter:
cat scan-assistant.pem | xargs - Copy the one-line
.pem.
Create the Scan Assistant certificate on Windows
Generate a self-signed certificate
- In PowerShell, create the private key.
- For an ECDSA key, enter:
New-SelfSignedCertificate -Subject "CN=scan.assistant.rapid7.com/emailAddress=" -KeyAlgorithm ECDSA_secp384r1 - For an RSA key, enter:
New-SelfSignedCertificate -Subject "CN=scan.assistant.rapid7.com/emailAddress=" -KeyAlgorithm RSA -KeyLength 3072
- For an ECDSA key, enter:
Add dates to your certificate
If you want to specify the start and expiration dates of your certificate, add any of the following to your key in combination with -NotAfter and -NotBefore: *(Get-Date).AddDays
-
(Get-Date).AddMonths
- (Get-Date).AddYears
For example,
New-SelfSignedCertificate -Subject "CN=scan.assistant.rapid7.com/emailAddress=" -KeyAlgorithm RSA -KeyLength 3072 -NotBefore (Get-Date).AddMonths(1) -NotAfter (Get-Date).AddMonths(121).
- Copy the generated thumbprint.
Export the PFX file
In PowerShell, run as administrator and enter:
$mypassword = ConvertTo-SecureString -String "PASSWORD" -Force -AsPlainText
Export-PfxCertificate -Cert Cert:\LocalMachine\My\THUMBPRINT -FilePath scan-assistant.pfx -Password $mypassword
Where PASSWORD is your password for the PFX file and THUMBPRINT is the thumbprint you created in step 1.
Add credentials to the console
Do not use Windows credentials with the Scan Assistant
Windows credentials should not be used alongside the Scan Assistant. The Scan Assistant acts as your ‘credential type’. Using both at the same time negates the Scan Assistant’s benefits.
- From your Vulnerability Management console, click on the site that you want to enable the Scan Assistant.
- Click Authentication > Add Credentials.
- Add a name and description.
- Click Account.
- In the Service Type field, select Scan Assistant.
- In the PKCS#12 File field, select the PFX file.
- Enter your file password.
- Click Create.
- Click Save.
Extract the one-line public certificate (PEM file)
- In PowerShell, run as administrator and enter:
$oMachineCert=Get-Item Cert:\LocalMachine\My\THUMBPRINT
$InsertLineBreaks=0
$oPem=new-object System.Text.StringBuilder
$oPem.Append("-----BEGIN CERTIFICATE----- ")
$oPem.Append([System.Convert]::ToBase64String($oMachineCert.RawData, $InsertLineBreaks))
$oPem.Append(" -----END CERTIFICATE-----")
$oPem.ToString()
Where THUMBPRINT is the thumbprint you generated in step 1.
- Copy the one-line
.pem.
How can I delete a certificate on Windows?
If you need to delete a certificate from the Windows certificate store, run the following in PowerShell:
Remove-Item -Path cert:\LocalMachine\My\581C1CA18731790790CF7392DC3510CFA5382BBD -DeleteKey

Remove-Item -Path cert:\LocalMachine\My\THUMBPRINT -DeleteKey
Create the Scan Assistant certificate on macOS
Prerequisites
- OpenSSL installed on your system
- Terminal or command-line access
Generate the private key
In the Terminal, generate an Elliptic Curve private key using the secp384r1 curve:
openssl ecparam -out scan-assistant.key -name secp384r1 -genkeyThis creates a scan-assistant.key file containing your private key. This key should be kept secure.
Generate a self-signed certificate
Generate a self-signed X.509 certificate valid for 365 days, replacing the following fieilds in the -subj parameter:
- O (Organization): Your company or organization name (e.g.,
Acme Corporation) - OU (Organizational Unit): Your department or division (e.g.,
IT Security) - CN (Common Name): The fully qualified domain name where Scan Assistant will be accessed (e.g.,
scan.assistant.yourdomain.com) - emailAddress: Contact email address for certificate management (e.g.,
security@yourdomain.com)
openssl req -new -nodes -x509 -out scan-assistant.pem -key scan-assistant.key -days 365 -subj "/O=YourOrganization/OU=YourDepartment/CN=scan.assistant.yourdomain.com/emailAddress=admin@yourdomain.com"Regenerating your certificate
The X.509 certificate you generate is only valid for 365 years. You must regenerate it prior to expiration to continue using the Scan Assistant.
This creates a scan-assistant.pem file containing your certificate.
Create the PKCS#12 Bundle
Combine the private key and certificate into a PKCS#12 (.p12) file:
openssl pkcs12 -export -inkey scan-assistant.key -in scan-assistant.pem -out scan-assistant.p12You will be prompted to enter an optional export password. This is recommended for security. Remember this password - you’ll need it when configuring Scan Assistant. This file should be kept secure.
Generated Files
After completing these steps, you will have three files:
scan-assistant.key- Your private keyscan-assistant.pem- Your X.509 certificatescan-assistant.p12- The PKCS#12 bundle for use with the Scan Assistant
How can I verify that the Scan Assistant is present and running on a Windows asset?
There are multiple ways to verify that the Scan Assistant is successfully installed on an asset.
Verifying the Scan Assistant is Listed as a Running Process
The Scan Assistant should be listed as a running process in the Task Manager.
- Open the Task Manager.
- Click on the Processes tab.
- Under the Name column click on the Scan Assistant dropdown.
- You should see the Rapid7 Scan Assistant listed under the Scan Assistant dropdown.
Checking for the Rapid7 Scan Assistant in the Windows Services
The Rapid7 Scan Assistant should be listed in the Windows Services.
- Open Services > Extended tab.
- Under the Name column look for the Rapid7 Scan Assistant.
Viewing the Scan Assistant Public Certificate in the Windows Registry
The Scan Assistant public certificate should be viewable in the Windows Registry. Also, Debug level logging for the Scan Assistant is enabled by setting the Debug registry value at 1.
- Open the Registry Editor.
- Click on HKLM\SOFTWARE > Rapid7 > Vulnerability Management (InsightVM).
- Open the ScanAssistant folder.
- In the Name column verify the Client Certificate is listed.
Validate whether an error is recorded in the Windows Application Event Log
If the client certificate is unable to load, an error is recorded in the Windows Application Event Log.
- Open the Event Viewer.
- Click the Windows Log Folder dropdown.
- Select Applications.
- In the Level column verify if an Error is listed.
Utilizing the Windows netstat-a command
The Windows netstat-a command can be issued from the Command Prompt to verify that the Scan Assistant is listening on TCP port 21047.
- Open the Command Prompt.
- Enter the netstat-a command:
\>netstat -a
What if I am unable to verify that the Scan Assistant is Installed
If you cant not verify that the Scan Assistant is successfully installed, ensure that you followed the installation steps correctly or contact your CSA for support.
How can I verify that the Network Scans can complete successfully?
There are two methods to verify that the Network Scans are able to successfully complete.
-
Check that all Scan Templates being used to assess assets with the Scan Assistant include TCP port 21047 for both Service Discovery and Asset Discovery.
-
Check that any network firewalls that may reside between Scan Engines and assets with the Scan Assistant installed have been configured to allow TCP port 21047.