Scan Engine Management on the Command Platform (Insight Platform)
Welcome to Scan Engine management on the Command Platform (Insight Platform)!
This feature allows you to pair your deployed Vulnerability Management (InsightVM) Scan Engines to the Command Platform (Insight Platform) so you can view them alongside your other data collection components as part of the broader Data Collection Management experience.
Current functionality
At this stage of development, pairing your Scan Engines to the Command Platform (Insight Platform) provides you with connectivity indicators, scan job metrics, and host resource usage figures for each applicable engine in your environment. You’ll also unlock validation scanning capabilities for your remediation projects. We’ll explain these features in detail in further sections.
Engine pairing characteristics
The current pairing function has the following characteristics:
- The Command Platform (Insight Platform) can pair with all your distributed Scan Engines regardless of their configured communication method.
- The procedure does not apply to the local Scan Engine included with the Security Console and any engine provisioned by Rapid7 through the External Scanning Service. The Command Platform (Insight Platform) cannot monitor engines in these categories.
- You only need to complete the pairing procedure once per Security Console.
- Completing this procedure automatically pairs all eligible engines that are in communication with your Security Console to the Command Platform (Insight Platform).
- Additionally, any new engine that you deploy and pair to your Security Console will automatically pair to the Command Platform (Insight Platform) going forward.
- If you wish, you can unregister all engines from the Command Platform (Insight Platform) globally by console command, or on an individual basis through the interface. See the Scan Engine Registration Controls section for instructions.
How to access the Scan Engine management experience
If you have Rapid7 Agents (Insight Agents) deployed in your environment, you may have already visited the Data Collection Management page to view your agents in their own dedicated space. You can access the Scan Engine view in the same way.
NOTE - Privileges required
You must be a Platform or product administrator to access the Scan Engine management interface.
To access the Scan Engine management interface:
- Go to insight.rapid7.com and sign in with your Insight account credentials.
- If you do not see the “My Products & Services” screen upon signing in, open the app switcher in the upper left corner of the screen and click My Account.
- Expand your left menu and click the Data Collection Management tab.
- On the “Data Collection Management” screen, click the Scan Engines tab.
How to pair your Scan Engines to the Command Platform (Insight Platform)
The initial state of the Scan Engines tab will prompt you to start the pairing procedure. Before you do, make sure that you have network rules in place that will allow your Scan Engines to initiate outbound communication to the Command Platform (Insight Platform). Configure these rules to allow outbound traffic to the following endpoints:
https://{region}.api.endpoint.ingress.rapid7.com
https://{region}.deployment.endpoint.ingress.rapid7.comIs your Rapid7 product subscription provisioned for the United States? Check your region code first!
As of April 12th, 2021, all new customers subscribing to Rapid7 products that elect to store their data in the United States will be provisioned for one of three data centers. Since these data centers have unique endpoints, any firewall rules you configure must correspond to the data center your organization is assigned to. Follow these steps to determine which United States data center your organization is part of:
- Go to insight.rapid7.com and sign in with your Rapid7 account email address and password.
- Navigate to the Platform Home page.
- If you are not taken to this page by default, expand the product dropdown in the upper left and click My Account.
- Look for the Data Storage Region tag in the upper right corner of the page below your account name. Your United States region tag will show one of the following data centers:
- United States - 1
- United States - 2
- United States - 3
Substitute the {region} portion of these endpoints with the code that corresponds to your selected Vulnerability Management (InsightVM) data region:
- United States - 1 -
us - United States - 2 -
us2 - United States - 3 -
us3 - Europe -
eu - Canada -
ca - Japan -
ap - Australia -
au
To pair your Scan Engines to the Command Platform (Insight Platform):
- Click Pair. A panel will display containing activation instructions.
- Open your Security Console in a separate browser tab and log in.
- In your Security Console, navigate to Administration > Console > Troubleshoot issues > Run commands to open the command console.
- Return to the Scan Engines tab of Data Collection Management. A
pair to platformcommand will display that includes your token. Copy this complete command to your clipboard. - Return to the command console interface in your Security Console. Paste your complete pairing command in the provided field and click Execute.
After executing this command, your Security Console will begin pairing each of your eligible engines to the Command Platform (Insight Platform). Return to the Scan Engine tab in Data Collection Management to view each engine in detail. Your tab title will now also display a number indicating how many engines are currently paired.
Need to update Scan Engines that are paired with an expired token?
The pair to platform command also supports an optional --force switch. When added to the pairing command, this switch instructs the Security Console to update the token being used by all currently paired Scan Engines with the new token specified in the command. The following example shows command syntax with the --force switch included (just substitute the {token} portion with your region code and token combination):
pair to platform --force {token}
Scan Engine cards
Now that you’ve paired your Scan Engines to the Command Platform (Insight Platform), you can view their performance health by looking at your Scan Engine cards.
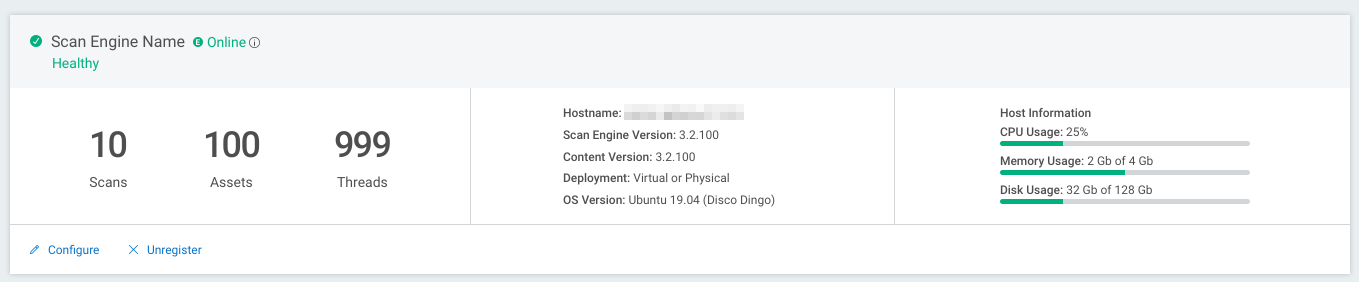
The management experience displays a card for each Scan Engine that has reported back to the Command Platform (Insight Platform). These cards contain real-time data for the following metrics:
- Scan jobs:
- The number of scans in progress
- The number of assets currently being scanned
- The number of threads being utilized on the engine host
- Host resources:
- CPU usage
- Memory usage
- Disk usage
In addition to these metrics, the card will also display host characteristics when they are available, such as hostnames, software and content versions, and operating systems.
TIP
All Scan Engine metrics shown on these cards update based on the last communication beacon between the engine and the Command Platform (Insight Platform).
Connectivity and operational statuses
Each Scan Engine has two distinct statuses at all times:
- Internet connectivity of the engine host
- Operational status of the engine host
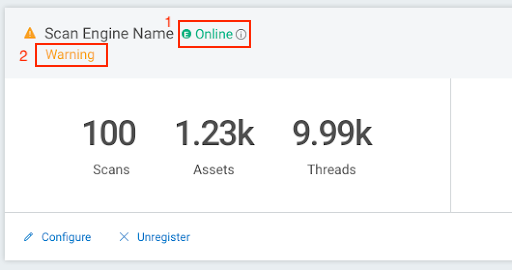
Scan Engine host internet connectivity will display as either “Online” or “Offline” depending on if the Command Platform (Insight Platform) can establish communication with it. The engine card will show an “Offline” status if communication has lapsed for more than 10 minutes. Hover your mouse cursor over the information icon next to this connectivity status to see when the engine last communicated with the Command Platform (Insight Platform).
In terms of Scan Engine operation, your engine cards will display one of the three following statuses:
- The “Healthy” status indicates that host disk usage is below 80% and CPU usage is below 100%
- The “Warning” status indicates that either of the following resource metrics are present:
- Disk usage is between 80-90%
- CPU usage has reached 100%
- The “Error” status indicates that either of the following resource metrics are present:
- Disk usage exceeds 90%
- Memory usage has reached 100%
What happens to stale engines over time?
Any Scan Engine that has not sent its status for more than 30 days will be removed from your Engines table and will no longer factor into your engine metrics. If the engine is able to check back in at a later time, it will reappear.
The Engine table itself functions as a rolling 30 day snapshot of all engines your environment that are currently paired to the Command Platform (Insight Platform). Consequently, engines shown here may differ from historical engines shown in your Security Console interface.
Configuration options
You can make some minor configuration changes to a paired Scan Engine by clicking Configure on the engine card. At this time, configuration options include modifying the name of the Scan Engine as it appears onscreen and providing an optional description.
Validation scanning for remediation projects
Pairing your Scan Engines to the Command Platform (Insight Platform) also enables validation scanning capabilities for Vulnerability Management (InsightVM)’s remediation projects feature. Running a validation scan allows you to immediately verify that your applied solutions have taken effect without requiring you to wait for your next scheduled scan or Rapid7 Agent (Insight Agent) assessment.
How validation scanning works
Vulnerability Management (InsightVM) validates remediation project solutions using the Scan Engines you’ve paired to the Command Platform (Insight Platform). You can run a validation scan from the detail view of any open remediation project you have. Validation scans target one or more individual solutions that you select as long as they currently have an “Open” or “Awaiting Verification” status.
Vulnerability Management (InsightVM) automatically selects the best Scan Engine to use when running a validation scan, namely the last engine to successfully scan the affected asset. Scan Engine selection for validation scanning is not configurable.
After a validation scan completes, affected solutions in your remediation project move to either the “Closed” or “Reopened” status based on the results.
Run a validation scan
User permissions required
Your user account must have the Start Unscheduled Scans site permission to run validation scans. Ensure you have site access to the sites that contain the assets you need to scan by following the steps outlined in our managing users and authentication docs page.
Follow these steps to run a validation scan on eligible solutions in your remediation project:
- In Vulnerability Management (InsightVM), click the Remediation Projects tab in your left menu.
- On the Remediation Projects page, click the name link of the project that has solutions you want to validate.
- Check the boxes of any eligible solutions you want to validate. The solution must have either the “Open” or “Awaiting Verification” status and have no scans already running on its affected assets to be eligible.
- A window informs you that the status of any “Open” solutions will change to “Awaiting Verification” as a result of this action. Click Continue to proceed with the validation scan.
- Check the Do not show again box if you want to run future validation scans immediately without this window appearing.
Your validation scan is now in progress!
If you have access to the Security Console component of Vulnerability Management (InsightVM), you can check the progress of your validation scan by clicking the scan in progress link inside the Run Validation Scan tooltip.
Scan Engine registration controls
If you elect to unpair one or all your Scan Engines from the Command Platform (Insight Platform), you can do so in the following ways.
Per engine unregistration
You can unpair individual Scan Engines from the Command Platform (Insight Platform) by clicking Unregister on the corresponding engine card. A window will appear asking for confirmation before the engine is unpaired.
Global unregistration
At this time, unpairing all Scan Engines from the Command Platform (Insight Platform) requires a command console operation.
To unregister all Scan Engines:
- In your Security Console, navigate to Administration > Console > Troubleshoot issues > Run commands to open the command console.
- Enter
unregister platformin the provided field and click Execute.
After executing this command, the Security Console will unpair each of your Scan Engines from the Command Platform (Insight Platform). Any new Scan Engines that you deploy and pair to your Security Console will no longer automatically pair to the Command Platform (Insight Platform) as well.
Proxy configuration instructions
If you prefer to pair your Scan Engines to the Command Platform (Insight Platform) through a web proxy, you can do so by making changes to the CustomEnvironment.properties file on each Scan Engine. You can implement this proxy configuration procedure before or after pairing the engine to the Command Platform (Insight Platform).
Authentication is not supported
Scan Engines do not currently support authentication in the proxy configuration.
Follow these steps to configure a proxy address for each Scan Engine:
- Navigate to the
nsedirectory on your Scan Engine host. Default installation paths for this directory are as follows:- Linux -
/opt/rapid7/nexpose/nse - Windows -
C:\Program Files\rapid7\nexpose\nse
- Linux -
- Locate and open the
CustomEnvironment.propertiesfile with a text editor.- If this file does not exist, create it manually.
- Add the following lines to
CustomEnvironment.propertiesand substitute{proxy_IP_or_hostname}and{proxy_port}with the appropriate values:
https.proxyHost={proxy_IP_or_hostname}
https.proxyPort={proxy_port}
For example, your proxy configuration lines should appear similar to this:
https.proxyHost=10.0.160.33
https.proxyPort=3128- Save and close
CustomEnvironment.propertieswhen finished. - Restart the Scan Engine service.
- For engines on Linux hosts, run
service nexposeengine restartin a terminal. - For engines on Windows hosts, open the service manager and navigate to the Nexpose Scan Engine service. Right-click the service name and click Restart.
- For engines on Linux hosts, run
- If you still need to do so, pair your engine to the Command Platform (Insight Platform) as you normally would.