Deploy Additional Consoles
If you are currently an Vulnerability Management (InsightVM) user, you can deploy up to 2 additional consoles (for a total of 3) at no extra cost. Each console is tied to a separate organization on the Command Platform (Insight Platform) (insight.rapid7.com). Separating the consoles this way enables you to have several Vulnerability Management (InsightVM) instances associated with a single customer account without data sharing or mixing.
You might need an additional console to:
- Allocate a console to a new acquisition or subsidiary
- Segregate company business units or data (for example, Paid Card Industry (PCI) environments from non-PCI)
- Separate geographical regions that have different requirements (for example, APAC/EMEA/LATAM)
Upgrading to Vulnerability Management (InsightVM) from Nexpose
If your company has already deployed multiple consoles and you are a current Nexpose user upgrading to Vulnerability Management (InsightVM), you will need to complete and submit the Vulnerability Management (InsightVM) migration request form: https://www.rapid7.com/products/insightvm/upgrade/ After submitting this form, your Customer Success Advisor will help you to migrate your primary and additional consoles to Vulnerability Management (InsightVM) one-by-one.
Here’s an overview of the different phases involved in this process:
- Request an additional console from your Customer Success Advisor (CSA).
- Deploy and activate the console using a 16-digit license key provided to you by Rapid7.
- Activate the console on the Command Platform (Insight Platform) using a “pairing key” to ensure the on-premise console is synched with the platform. A Customer Success Advisor will give you the pairing key.
Request an Additional Console
To request an additional console, email your Rapid7 Customer Success Advisor (CSA) the following information:
- The number of assets you want allocated to the additional console. This number will be subtracted from the asset count on your primary console or license.
- The region where data from this console will be sent (United States, Canada, Australia, Japan, or Europe).
- The name of the additional console. We’ll use the name you provide to create a new organization in the Command Platform (Insight Platform). You can change the console/organization name later from the Company Settings tab in the Command Platform (Insight Platform).
Deploy the Additional Console
Before starting, make sure you:
- Provision a new system which meets the system requirements that best map to your Vulnerability Management (InsightVM) asset count, as well as your network and scanning frequency, based on the Capacity Planning Guide.
- Ensure that this new server is properly configured according to the requirements listed here.
- Install Vulnerability Management (InsightVM) on the new system using the appropriate installer for Linux or Windows.
After installing Vulnerability Management (InsightVM), you’ll need to activate this new console. Before activation, confirm you’ve made the appropriate firewall rule changes to allow your additional console to connect to the Rapid7 update server.
Activate the New Console
- Log in to the console by opening your browser and connecting to the following address, substituting
<IP_address_of_new console>with the IP address of the additional console:
https://<IP_address_of_new console>:3780
- You will see a prompt to enter a product key to activate the console: Enter the 16-digit license key (formatted as XXXX-XXXX-XXXX-XXXX) your Customer Success Advisor sent you.
Another Way to Activate the Console
If you do not see a prompt, you can enter the product key in the console UI:
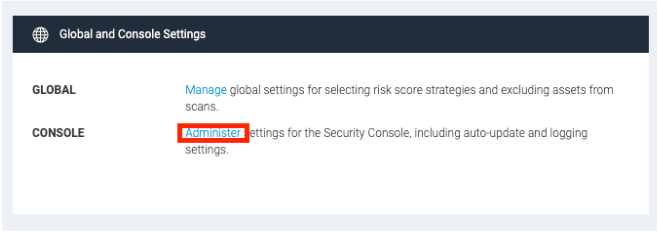
- Navigate to Administration > “Global and Console Settings” section > Administer link > Licensing > Activate a New License button
- Click Activate with Key
Once you successfully activate the console, you must now activate the console on the Command Platform (Insight Platform) so that data from your on-premise console is synched to the Command Platform (Insight Platform).
Activate the Console on the Command Platform (Insight Platform)
- First, you must make appropriate firewall rule changes so your additional console can send data to the Command Platform (Insight Platform). Note these firewall rules are different from the ones mentioned earlier in “Deploy an Additional Console.“
- Log in to the Command Platform (Insight Platform) .
- At the top of the “Platform Home” page, click on the tab that shares the name of your newly-created organization (this is the console name you provided to your Customer Success Advisor when you requested the additional console.)
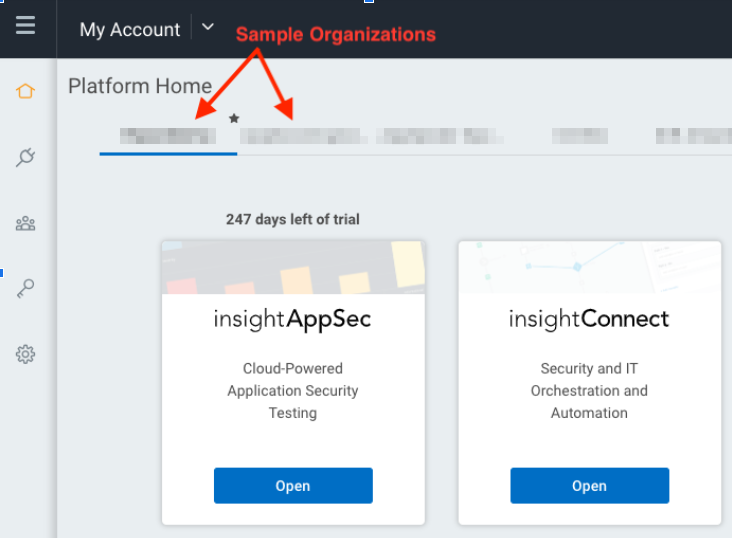
- Click the Vulnerability Management (InsightVM) tile to obtain the pairing key.
- Copy the pairing key, which is formatted as XXXXXXXX-XXXX-XXXX-XXXX-XXXXXXXXXXXX-XX.
- Log in to the console by opening your browser and connecting to the following address, substituting
<IP_address_of_new console>with the IP address of the additional console:
https://<IP_address_of_new console>:3780
- In the user interface, navigate to the following location: On the Administration page, in the Console > Platform section, click Manage data synchronization with the Platform.
- Paste the pairing key in the appropriate field.
- Click Activate Console.
What to Expect After Command Platform (Insight Platform) Activation
Once you have activated your additional console on the Command Platform (Insight Platform), data will start syncing from your on-premise console to the Command Platform (Insight Platform). Times to upload all data vary based on the size and amount of data stored on the console, but it can take up to a day or longer for larger deployments with longer data retention settings.
Dashboard data will populate on the Command Platform (Insight Platform) incrementally, but data synchronization must be complete before there can be parity with console numbers. You can confirm that your additional console has been successfully activated by clicking the Vulnerability Management (InsightVM) tile and confirming that the metrics shown in the Dashboard Cards reflect what your on-premise console shows.