Managing versions, updates, and licenses
New port for Vulnerability Management product updates
A server update has been implemented to utilize SSL for communication encryption and to better handle client connection with modern libraries. You must allow your server hosting Vulnerability Management to make outbound connections to updates.rapid7.com on port 443 in order to receive future Vulnerability Management product and content updates.
This section addresses how to keep the application updated.
Viewing version and update information
It is important to keep track of updates and to know which version of the application you are running. For example, a new vulnerability check may require the latest product update in order to work. If you are not seeing expected results for that check, you may want to verify that the application has installed the latest product update. Also, if you contact Technical Support with an issue, the support engineer may ask you which version and update of the application you are running.
- Click the Administration tab of the Security Console interface.
- In Console > Licensing section, click View current license.
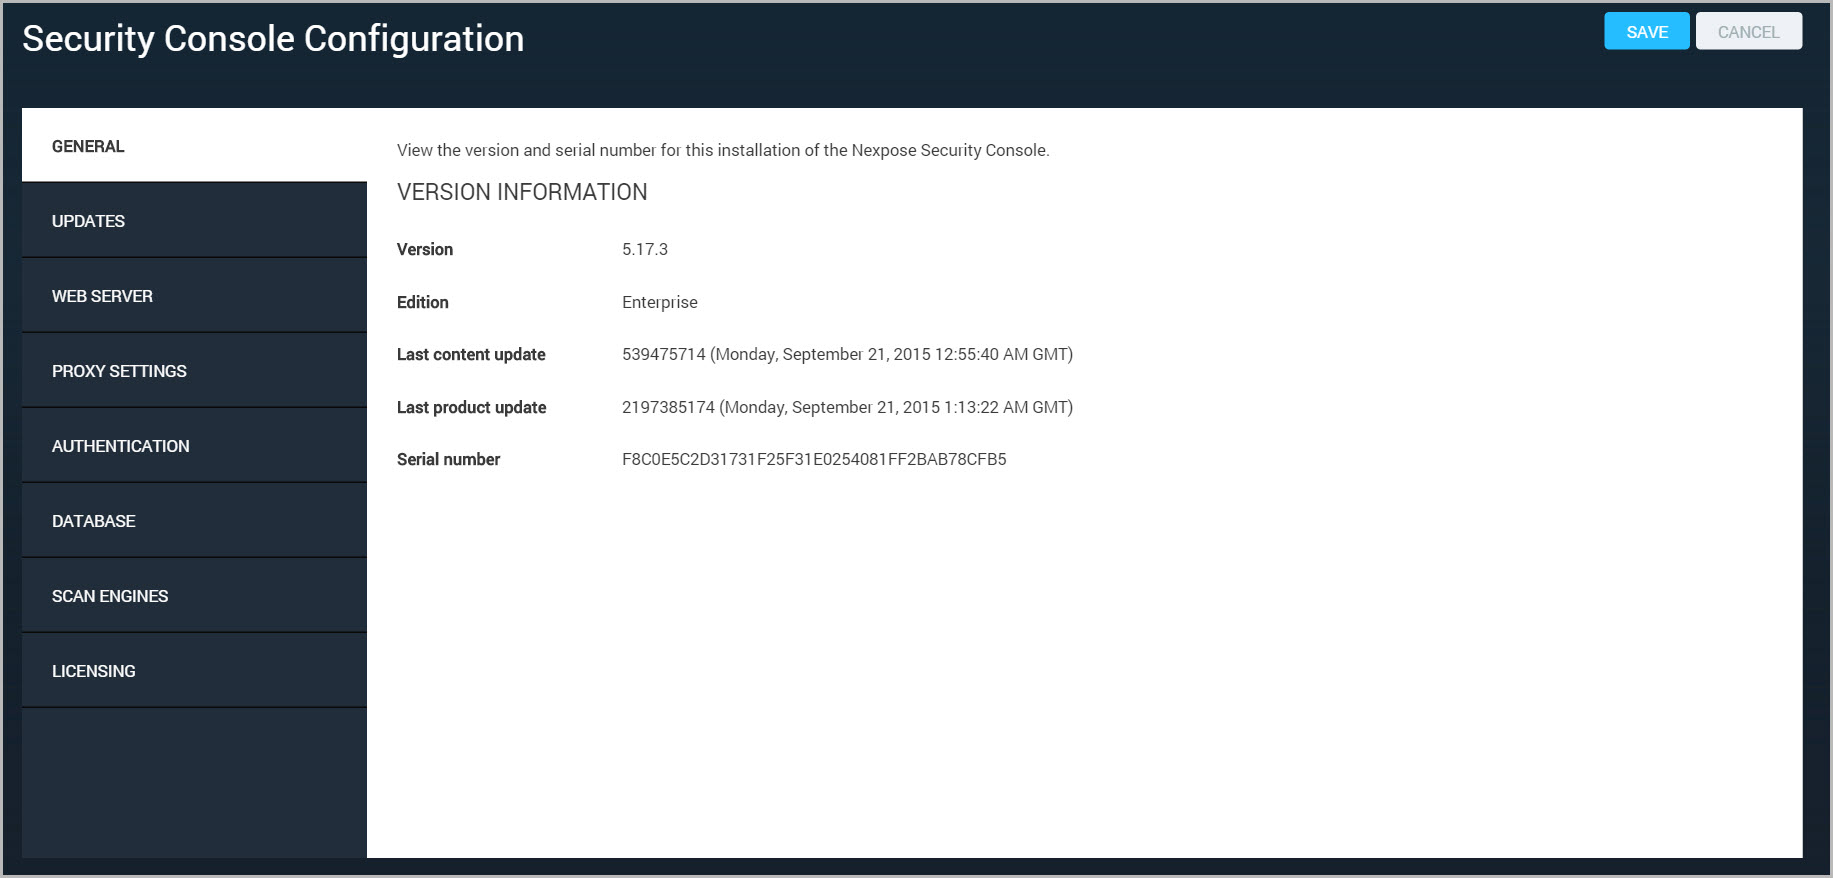
The General page of the Security Console Configuration panel will display. On this page you can view the current version of the application. You can also view the dates and update IDs for the current product and content updates. Release announcements always include update IDs, so you can match the IDs displayed on the Security Console page with those in the announcement to verify that you are running the latest updates.
Viewing, activating, renewing, or changing your license
On the Licensing page, you can see license-related information about your Security Console. You also can activate a new license or start the process to modify or renew your license. Your Security Console must be connected to the Internet to activate your license.
If your Security Console is not connected to the Internet, see Managing updates without an Internet connection.
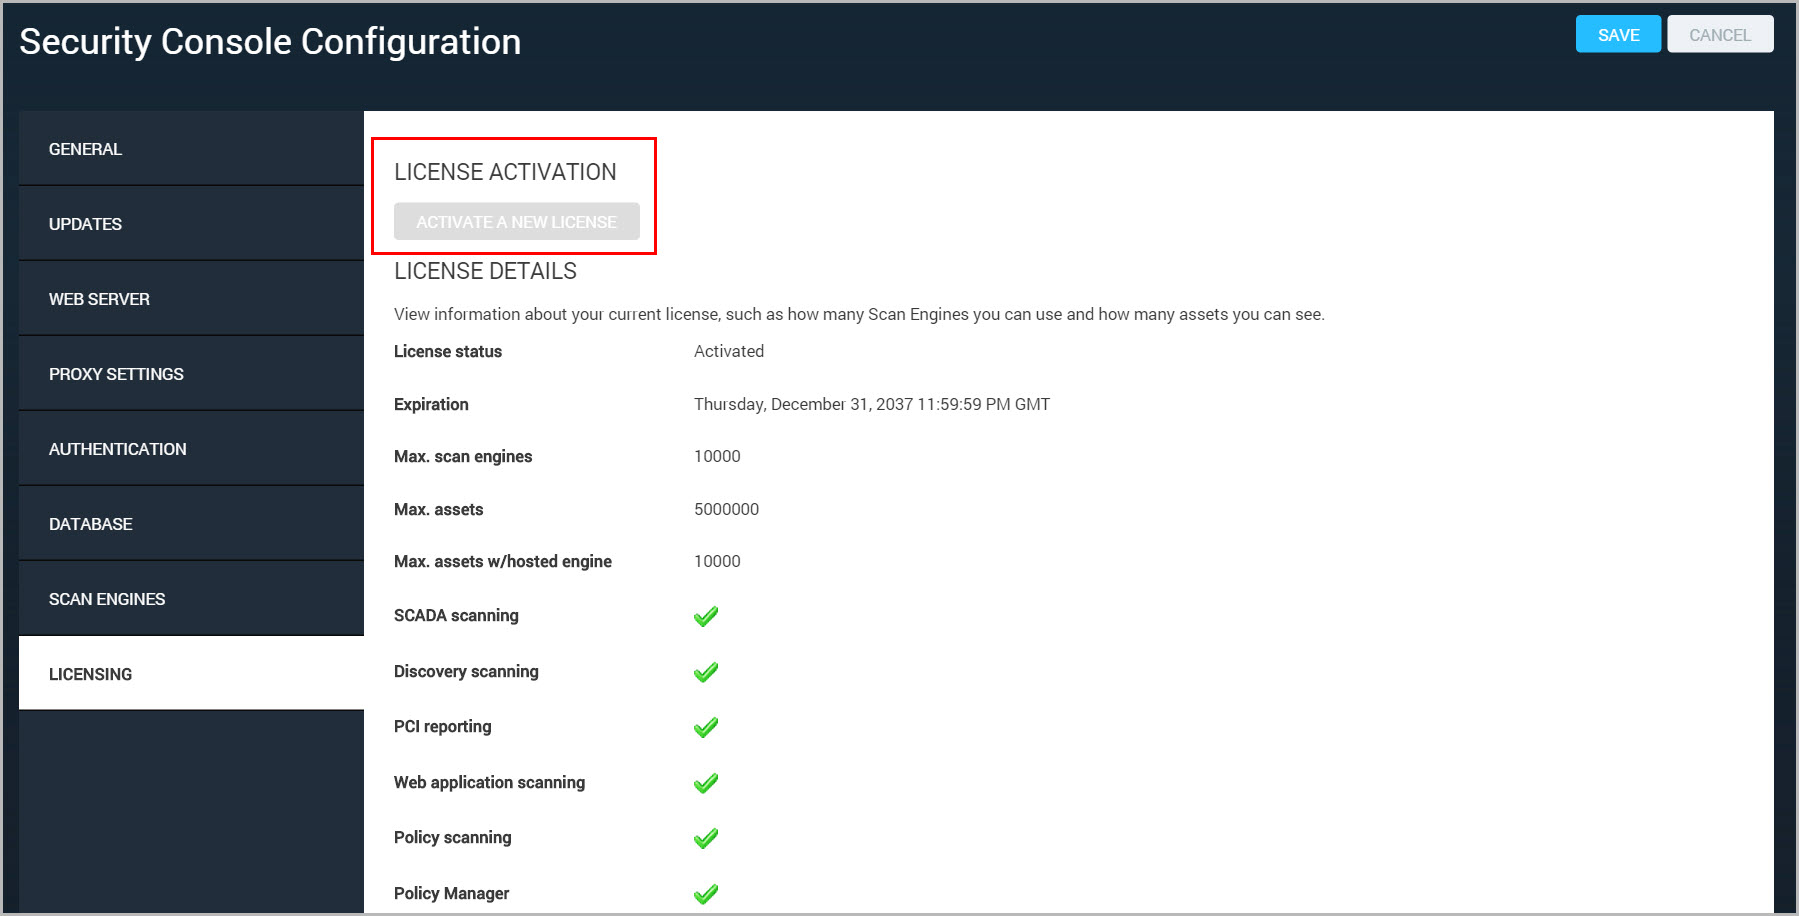
The License Activation area displays general information about your license.
- If your license is active, you will see a link for contacting Rapid7 to modify your license, which is optional.
- If your license is expired, you will see a link for contacting Rapid7 to renew your license. You will need an active license in order to run scans and create reports.
Activating your license with a license key
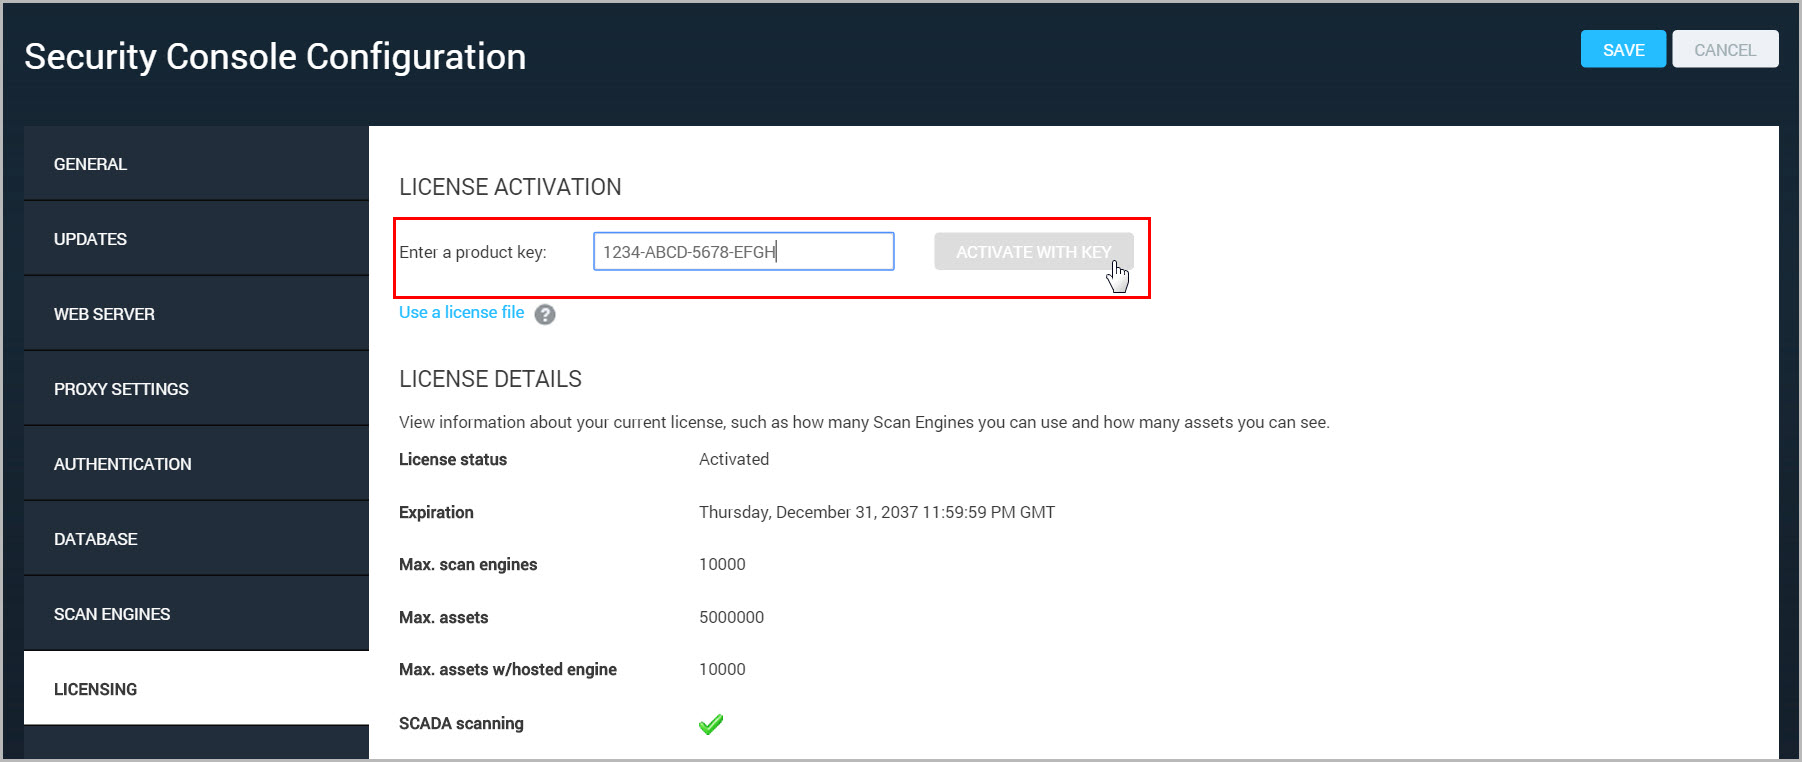
If your Security Console has Internet access, you can activate your license with a license key. Provided to you by the Account Management team, the key is a string of 16 numbers and letters separated into four groups by hyphens.
- On the Licensing page, click Activate a New License. The Security Console displays a text box.
- Enter the key in the text box. You can copy the key from the e-mail that was sent to you from the Account Management team.
- Click Activate with key. The Security Console displays a success message. You do not have to click Save. The application does not have to restart.
Activating your license with a license file
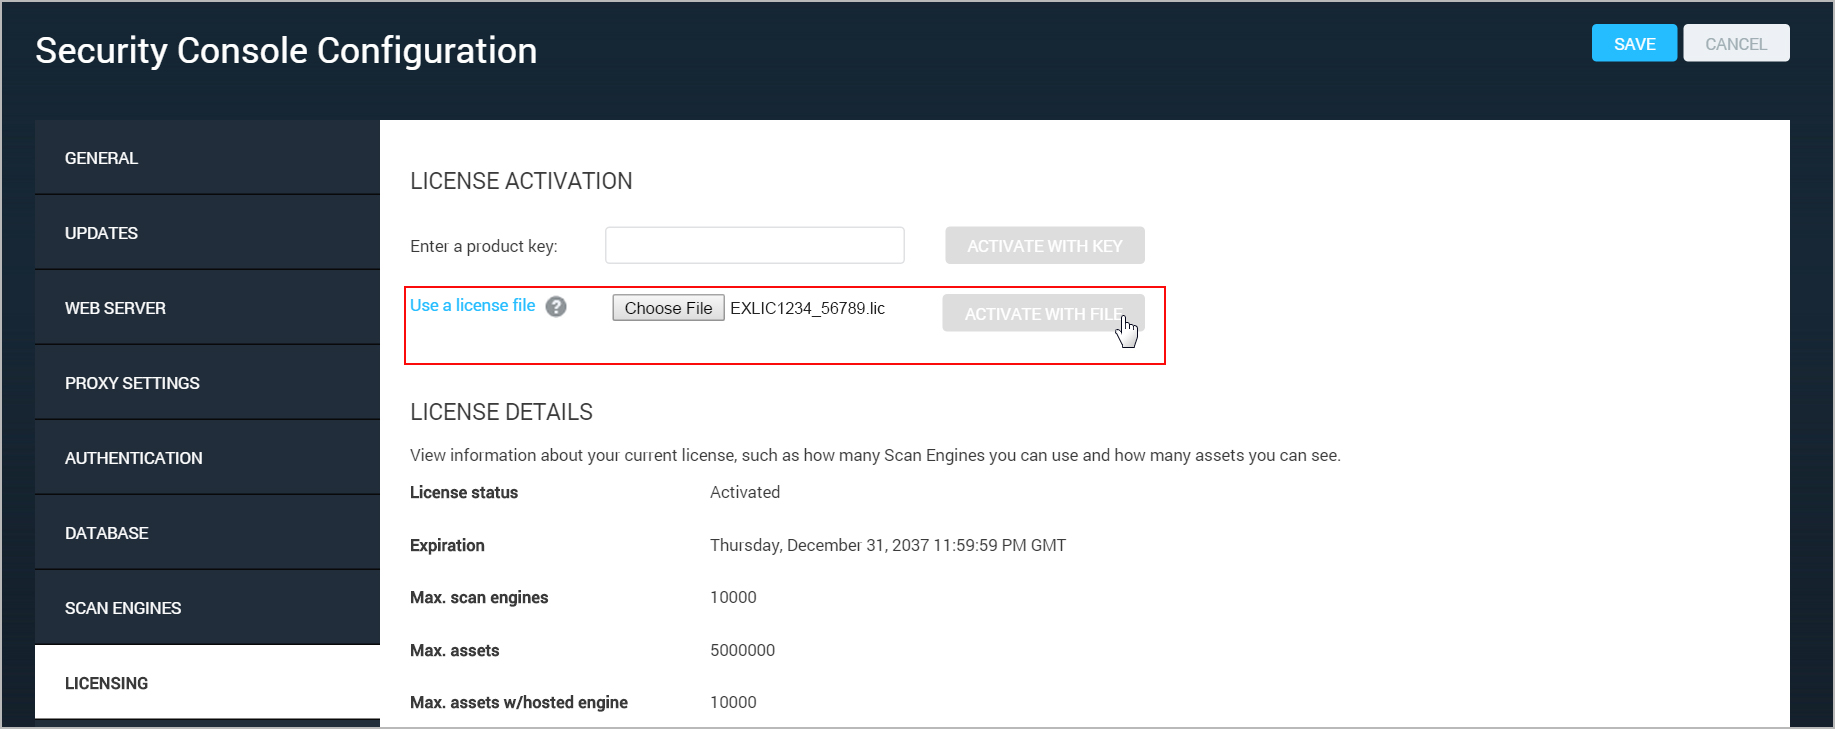
If your Security Console does not have access to the Internet or to the updates.rapid7.com server, you can activate your license with a license file. Provided to you by the Account Management team, this file has a .lic extension and lists all the features and scanning capacities that are available with your license.
To activate with a license file:
- After you receive the license file from the Account Management team, download it.
- Using the computer that you downloaded the file on, log onto the Security Console.
- Click the Administration tab.
- In the Console > Licensing section, click Console > Licensing > Activate a license a license. The Security Console displays the Security Console Configuration panel.
- Click Licensing in the left navigation pane. The Security Console displays the Licensing page.
- Click Activate a New License.
- Click the link labeled Use a license file. A button appears for choosing a file.
- Click the Choose file button.
- Find the downloaded .lic file in your file system and select it. The file name appears on the Licensing page.
- Click the Activate with file button. The Security Console displays a success message.
- Click the OK button.
The Licensing page refreshes and displays the updated license information in the License Details area. You do not have to click Save, and the Security Console does not have to restart.
Viewing license details
In the License Details area of the Licensing page, you can see more information about your license:
- The value for License Status is one of four different modes, depending on the status of your license.
- The value for Expiration is the date that your current license expires.
- The value for Max. Scan Engines is the total number of internal Scan Engines that you can use. These Scan Engines can be installed on any host computers on your network.
- The value for Max. Assets to Scan is the total number of assets that you can scan with your internal Scan Engines.
- The value for Max. Assets to Scan w/ Hosted Engine is the total number of assets that you can scan with a Hosted Scan Engine.
- If the value for SCADA Scanning is Enabled, you can scan assets with the SCADA scan template. For a description of this template, see Where to find SCAP update information and OVAL files.
- If the value for Discovery Scanning is Enabled, you can run discovery scans to determine what assets are available on your network without performing vulnerability checks on those assets.
- If the value for PCI Reporting is Enabled, you can create reports using the PCI Executive Overview and PCI Audit report templates. If this feature is disabled, it will still appear to be available in your scan template, but it will not be active during scans.
- If the value for Policy Scanning is Enabled, you can scan assets to verify compliance with configuration policies. If this feature is disabled, it will still appear to be available in your scan template, but it will not be active during scans.
Managing updates with an Internet connection
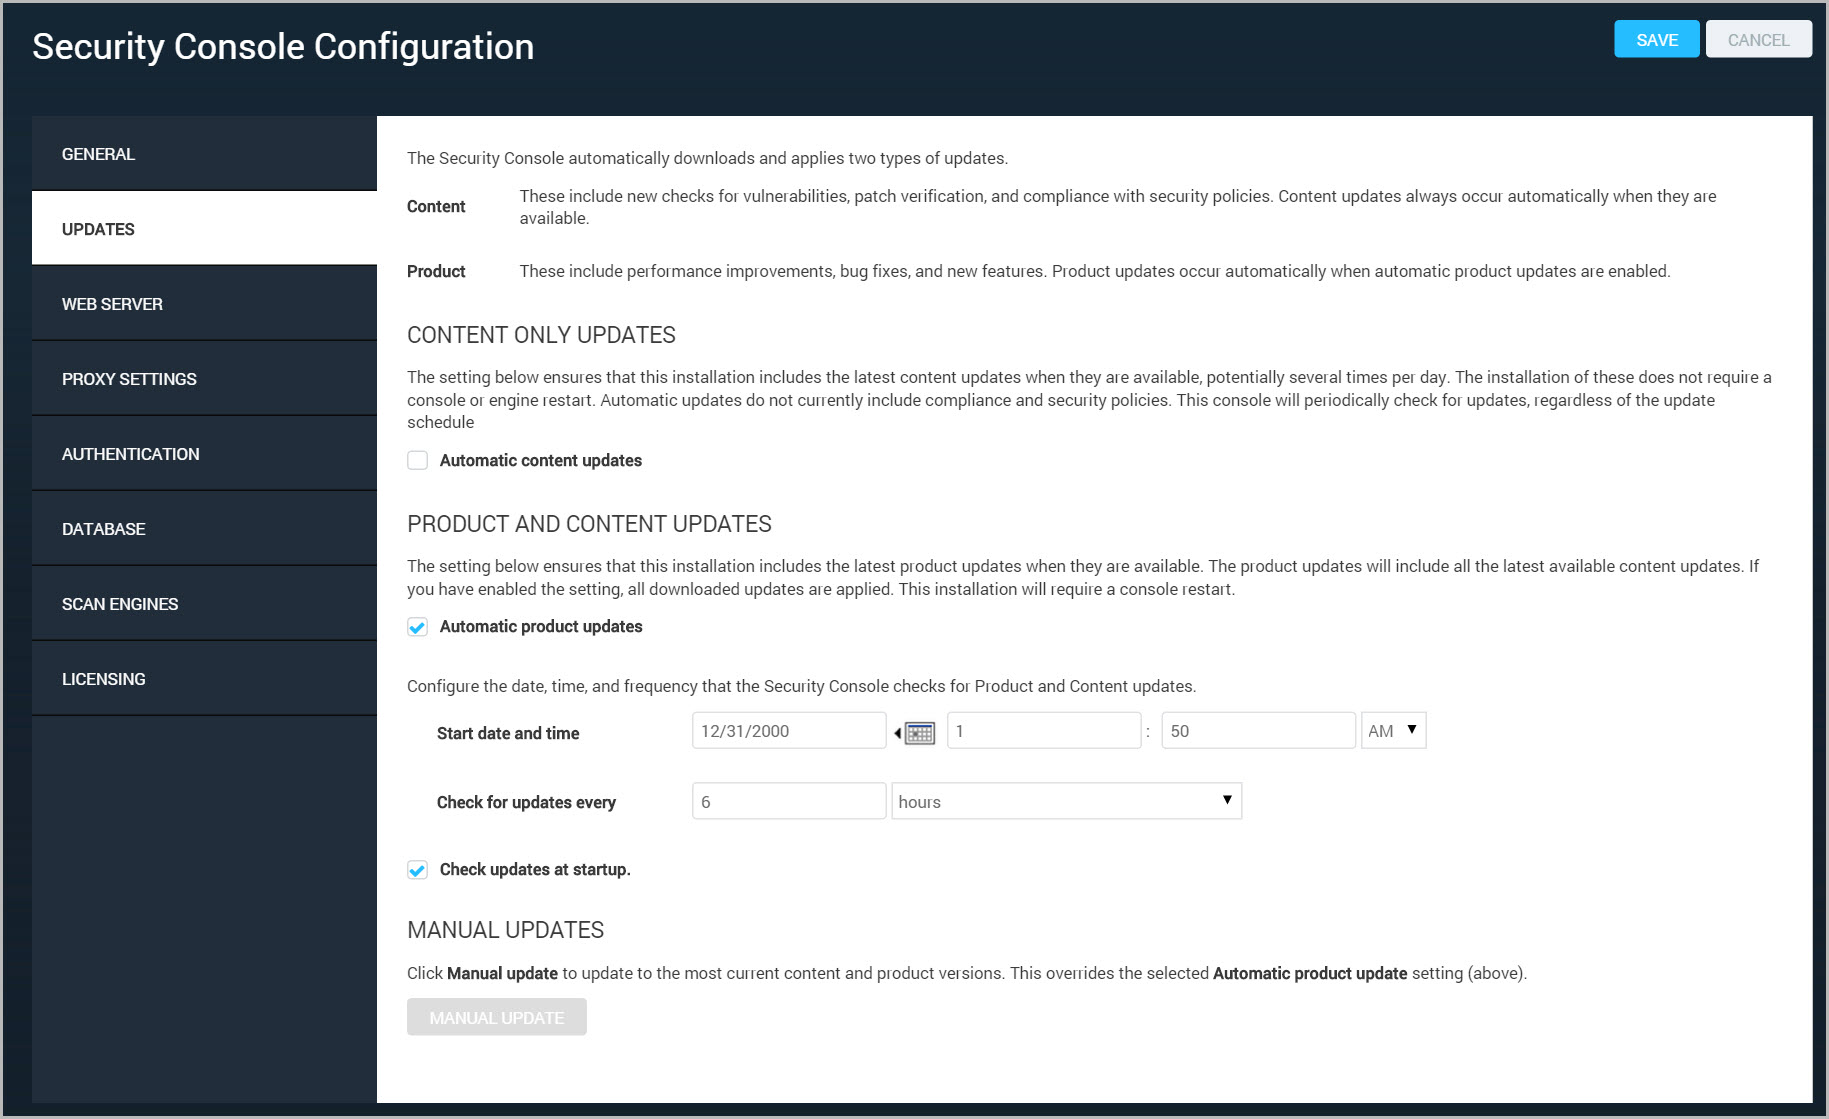
By default, the Security Console automatically downloads and applies two types of updates.
Content updates
Content updates include new checks for vulnerabilities, patch verification, and security policy compliance. Content updates always occur automatically when they are available. However, it is possible to disable automatic content updates in the Security Console Configuration and schedule them at a time of your choosing.
Product updates
Product updates include performance improvements, bug fixes, and new product features. It is possible to disable automatic product updates in the Security Console Configuration and update the product manually.
When you apply a product update, the latest available content updates up to the current date will also be applied.
Disabling automatic product updates
You can disable automatic product updates and initiate one-time product updates on an as-needed basis. This gives your organization the time and flexibility to train staff or otherwise prepare for updates that might cause changes in workflow. For example, a new feature may streamline a particular workflow by eliminating certain steps.
Some new vulnerability and policy checks, which are included in content updates, require concurrent product updates in order to work properly.
To disable automatic product updates:
- Click the Administration tab.
- In the Console > Info section, click View general information and updates.
- Select Updates from the menu on the left-hand side.
- Clear the checkbox labeled Enable automatic product updates. A warning dialog box appears about the risks of disabling automatic product updates. Click Disable automatic product updates to confirm that you want to turn off this feature. Or click Cancel to leave automatic product updates enabled.
- Click Save. Whenever you change this setting and click Save, the application downloads any available product updates. If you have disabled the setting, it does not apply any downloaded product updates.
Enabling automatic product updates
Your PostgreSQL database must be version 9. Otherwise, the application will not apply product updates. If you are using an earlier version of PostgreSQL, see Migrating the database.
Enabling automatic product updates ensures that you are always running the most current version of the application.
To enable automatic product updates after they have been previously disabled:
- Go to the Administration tab.
- In the Console > Info section, click View general information and updates.
- Select Updates from the left navigation pane.
- Select the Enable automatic product updates check box.
- Click Save. Whenever you change this setting and click Save, the application downloads any available product updates. If you have enabled the setting, it also applies any downloaded product updates and restarts.
Manual product updates
When automatic product updates have been disabled, you can manually download product updates.
By using this one-time update feature, you are not enabling future automatic product updates if they are not currently enabled.
To manually download a new product update:
- Go to the Administration page.
- In the Console > Info section, click View general information and updates.
This option only appears if you have already disabled automatic product updates as described in Disabling automatic product updates.
The list of current and available updates appears.
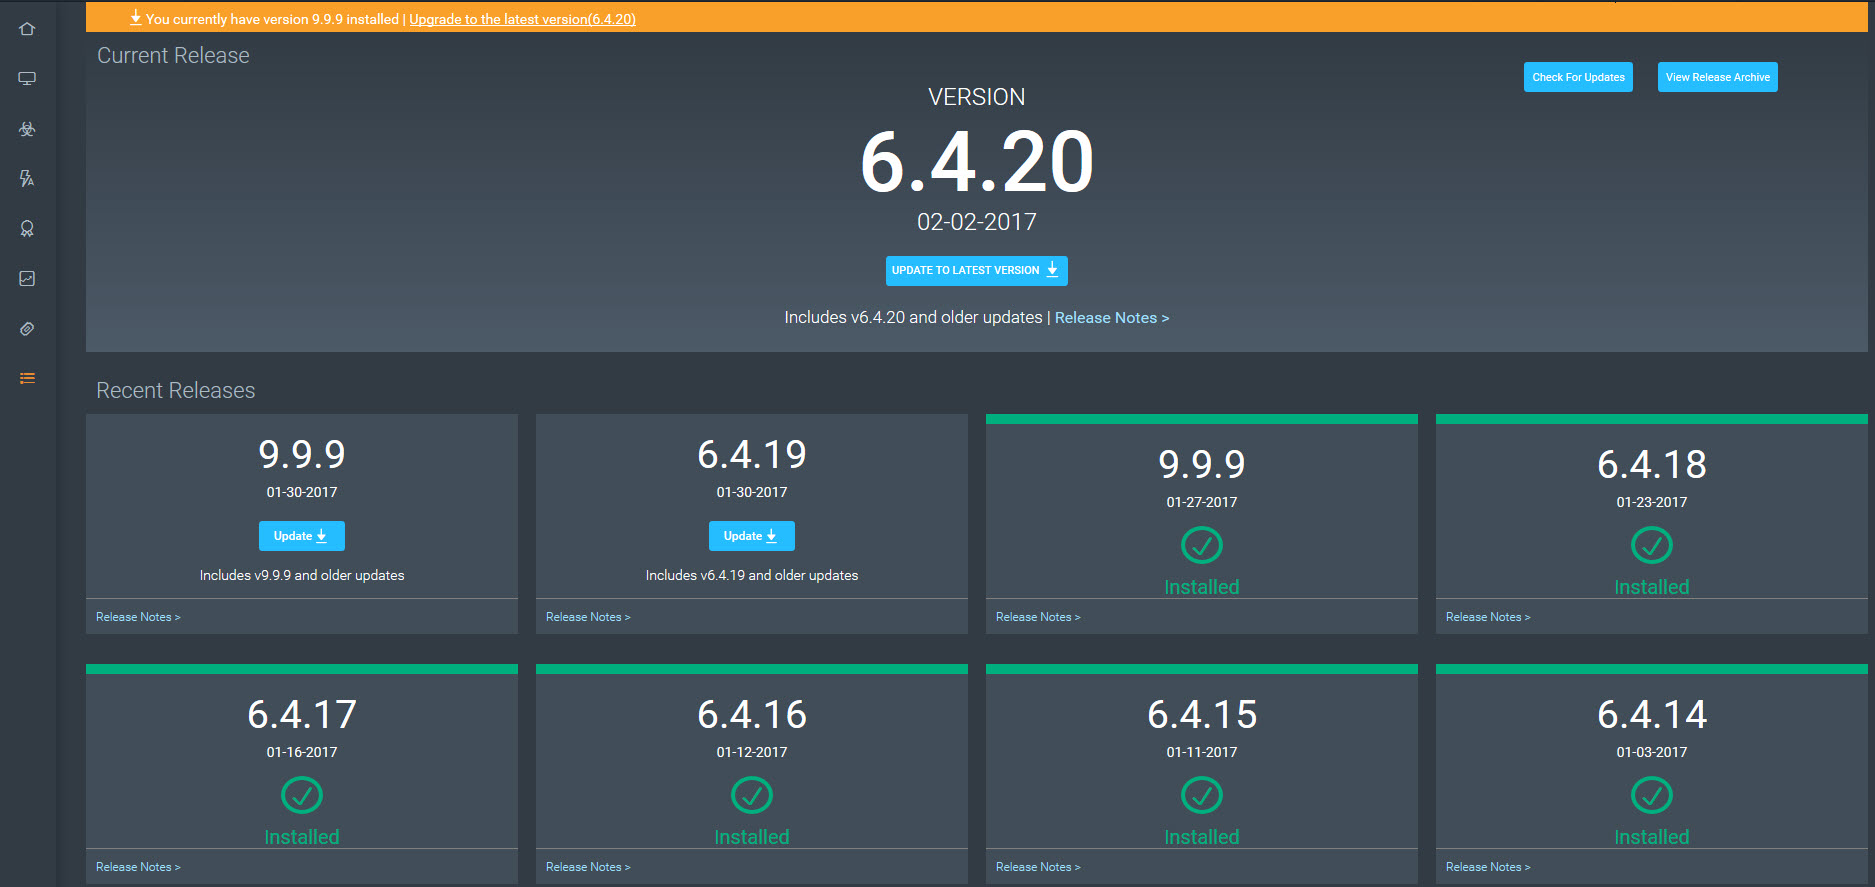
- Select Updates from the left navigation pane. The Releases page appears.
- To update to the most recent product release, click Update to Latest Version.
- If you have not updated for a while, there may have been multiple versions released since your last update. In this case, you can select a version to which to update. To select a previous version to update to, navigate to that version and click Update. Releases up to and including that version will be applied.
- On the Confirm Update dialog, click Update. or (Optional) Click Cancel if you do not want to perform the update.
Scheduling automatic updates
By default, the Security Console queries the update server for updates every six hours. If an update is available, the console downloads and applies the update and then restarts. You can schedule updates to recur at specific times that are convenient for your business operations. For example, you may want updates to only occur during non-business hours or at times when they won’t coincide with and disrupt scans.
Content updates are always applied according to the schedule, and product updates are applied according to the schedule only if they are enabled.
To schedule updates:
- Go to the Administration page.
- In the Console > Info section, click View general information and updates.
- Select Updates from the left navigation pane. The Updates page appears.
- If you want to prevent the Security Console from applying any available updates whenever it starts up, clear the appropriate checkbox. Disabling this default setting allows you to resume normal operations after an unscheduled restart instead of delaying these operations until any updates are applied.
- Select a date and time to start your update schedule.
- Select how frequently you want the Security Console to apply any available updates once the schedule is in effect.
- Click Save.
Configuring proxy settings for updates
If the Security Console does not have direct Internet access, you can use a proxy server for downloading updates. In most cases, Technical Support will advise if you need to change this setting. This topic covers configuring proxy settings for updates. You can also learn how about Using a proxy server for sending logs.
For information on configuring updates for an Appliance, see the Appliance Guide which you can download from the Support page of Help.
To configure proxy settings for updates:
- Click the Administration tab. The Administration page appears.
- In the Console > Info section, click View general information and updates.
- Go to the Proxy Settings page.
- Enter the information for the proxy server in the appropriate fields:
- The Name or address field is set to updates.rapid7.com by default, which means that the Security Console is configured to contact the update server directly. If you want to use a proxy, enter the name or IP address of the proxy server.
- The Port field is set to 443 by default because the Security Console contacts the update server on that port. If you want to use a proxy, and if it uses a different port number for communication with the Security Console, enter that port number.
- The Response timeout field sets the interval that the Security Console will wait to receive a requested package before initiating a timeout of the transfer. The default setting is 30,000 ms, or 30 seconds. The minimum setting is 1,000 ms, and the maximum is 2,147,483,647 ms. A proxy server may not relay an entire requested package to the Security Console until it downloads and analyzes the package in its entirety. Larger packages require more time. To determine how long to allow for a response interval, see the following topic: _Determining a response timeout interval for the proxy.
- The Security Console uses the information in the Domain, User name, and Password fields to be authenticated on a proxy server. If you want to use a proxy server, enter required values for those fields.
After you enter the information, click Save.
Determining a response timeout interval for the proxy
To determine a timeout interval for the proxy server, find out how much time the Security Console requires to download a certain number of megabytes. You can, for example, locate the downloaded .JAR archive for a recent update and learn from the log file how long it took for the Security Console to download a file of that size.
Open the nsc.log file, located in the [installation_directory]/nsc directory. Look for a sequence of lines that reference the download of an update, such as the following:
2013-06-05T00:04:10 [INFO] [Thread: Security Console] Downloading update ID 1602503.
2013-06-05T00:04:12 [INFO] [Thread: Security Console] Response via 1.1 proxy.example.com.
2013-06-05T00:05:05 [INFO] [Thread: Security Console] Response via 1.1 proxy.example.com.
2013-06-05T00:05:07 [INFO] [Thread: Security Console] Acknowledging receipt of update ID 1602503.
Note the time elapsed between the first entry (Downloading update ID...) and the last entry (Acknowledging receipt of update...).
Then go to the directory on the Security Console host where the .JAR archives for updates are stored: [installation_directory]/updates/packages. Locate the file with the update ID referenced in the log entries and note its size. Using the time required for the download and the size of the file, you can estimate the timeout interval required for downloading future updates. It is helpful to use a larger update file for the estimate.
In most cases, a timeout interval of 5 minutes (300,000 ms) is generally sufficient for most update file sizes.
Managing updates without an Internet connection
Option 1: Using the product installer
If your network environment is isolated from the Internet, you can apply an update by running the newly-released installer. The installers that are published with each release automatically scan your current installation for files to repair or update and they apply those changes.They leave your database and configuration settings intact.
An “update” installation leaves your database and configuration settings intact. The only changes it makes to your deployment are the updates.
To download the installer, you will require one computer with Internet access.
Before you begin, you must download the latest installer for your operating system. Follow the instructions in the installer documentation.
After you download the appropriate installer, take the following steps:
- If the service is running, stop it to allow the installer to apply updates or repairs.
- Run the installer. For detailed instructions, see Update your offline environment below.
- Click OK to continue with the updates and installation. Upon completing the installation, the installer displays a success message.
- Click Finish to exit the installer.
- Restart the Vulnerability Management service and log onto the Security Console. The Security Console displays a page that summarizes the update. Many releases include two updates: content and product. You can click the News link to see if another update has been applied for the release date.
Option 2: Using the offline product and content updates feature in the Security Console
If your environment is not connected to the internet, you can manually upload the latest product and content updates independently of the product release cycle.
This measure ensures your environment has the most recent vulnerability definitions, policy content, and product improvements, without requiring direct internet access. If you intend to use this feature, then you will need to perform regular manual updates in the future at regular intervals to ensure the best coverage.
To do so, you must enable the Allow offline product and content updates feature in the Security Console. This allows you to manually upload an update package that you get from the Update Server.
Internet connectivity
Do not enable this feature if your environment is connected to the internet. This feature is designed exclusively for environments that are not connected to the internet. Enabling it on an internet-connected Security Console will disable automatic updates and take the Security Console offline.
To enable offline updates:
- In the Security Console, navigate to Administration > Console > Information > General.
- Take note of the date that is displayed beside ‘Last content update’.
- On an internet-connected computer, open a command window and run this command, replacing the license file placeholder in
<license file>with the appropriate license file and the date with the required date (see below for further details on the date value):
curl 'https://updates.rapid7.com/updates/update/bundle/fetch' -F 'fromDate=2025-01-01' -F `licenseFile=@<license file>` > updateBundle1.zip- In the Security Console, navigate to Administration > Console > Updates.
- From the Updates tab, look for the Product and Content Updates section and select Allow offline product and content updates.
- Read the message that appears and click Continue.
- Click Choose File and browse and select the package ZIP file.
- Click Upload Update Package.
- When the success message displays, click OK.
- Click Save.
Historic updates are provided up to 12 months in the past. Bundles will provide up to 30 days of updates at a time. If you require updates that extend further than 30 days, you will need to make multiple requests, changing the date request parameter. When requesting updates, you will need to request them from the oldest date forwards and you should apply them sequentially by downloading the bundle and uploading it to the console, oldest to newest.
To request additional updates after 30 days:
For the first 30 days
curl 'https://updates.rapid7.com/updates/update/bundle/fetch' -F 'fromDate=2025-01-01' -F 'licenseFile=@<license file>' > updateBundle1.zipFor the next 30 days
curl … -F 'fromDate=2025-01-31' … > updateBundle2.zipFor the final 30 days
curl … -F 'fromDate=2025-03-02' … > updateBundle3.zipOnce the updates are complete, you can view the current version information on the General tab.